The Dispatch | Expert | Scudo Hub
Get help & share your Citroen Dispatch (Jumpy) | Peugeot Expert | Fiat Scudo tips
You are not logged in.
- Topics: Active | Unanswered
Pages: 1
#1 Maintenance » Radiator Drain » 2016-03-11 16:56:46
- Gareth
- Replies: 0
Hello, I need to drain about a litre of fluid from the radiator in order to put in some Rislone leak fix. Does the van need to be jacked up to reach a valve underneath the radiator or can it be accessed "blind" withing raising the front? Any shortcuts or tips to get fluid out of the radiator?
Thanks.
#2 Re: Maintenance » How to get subwoofer power cable to battery? » 2016-03-11 16:51:07
So do you start in the engine and work your way back in to the van? Any chance of a bit more detail. Thanks.
#3 Re: Maintenance » How to get subwoofer power cable to battery? » 2016-02-17 09:23:52
I think that is exactly what it is Casper. It is very hard to access so very difficult to get a better picture but after googling it seems to be one of those. Wondering on the best way to get it out. The polite way by taking the lower dash off of the rude way by just trying to screw/ nail/ bust through it.
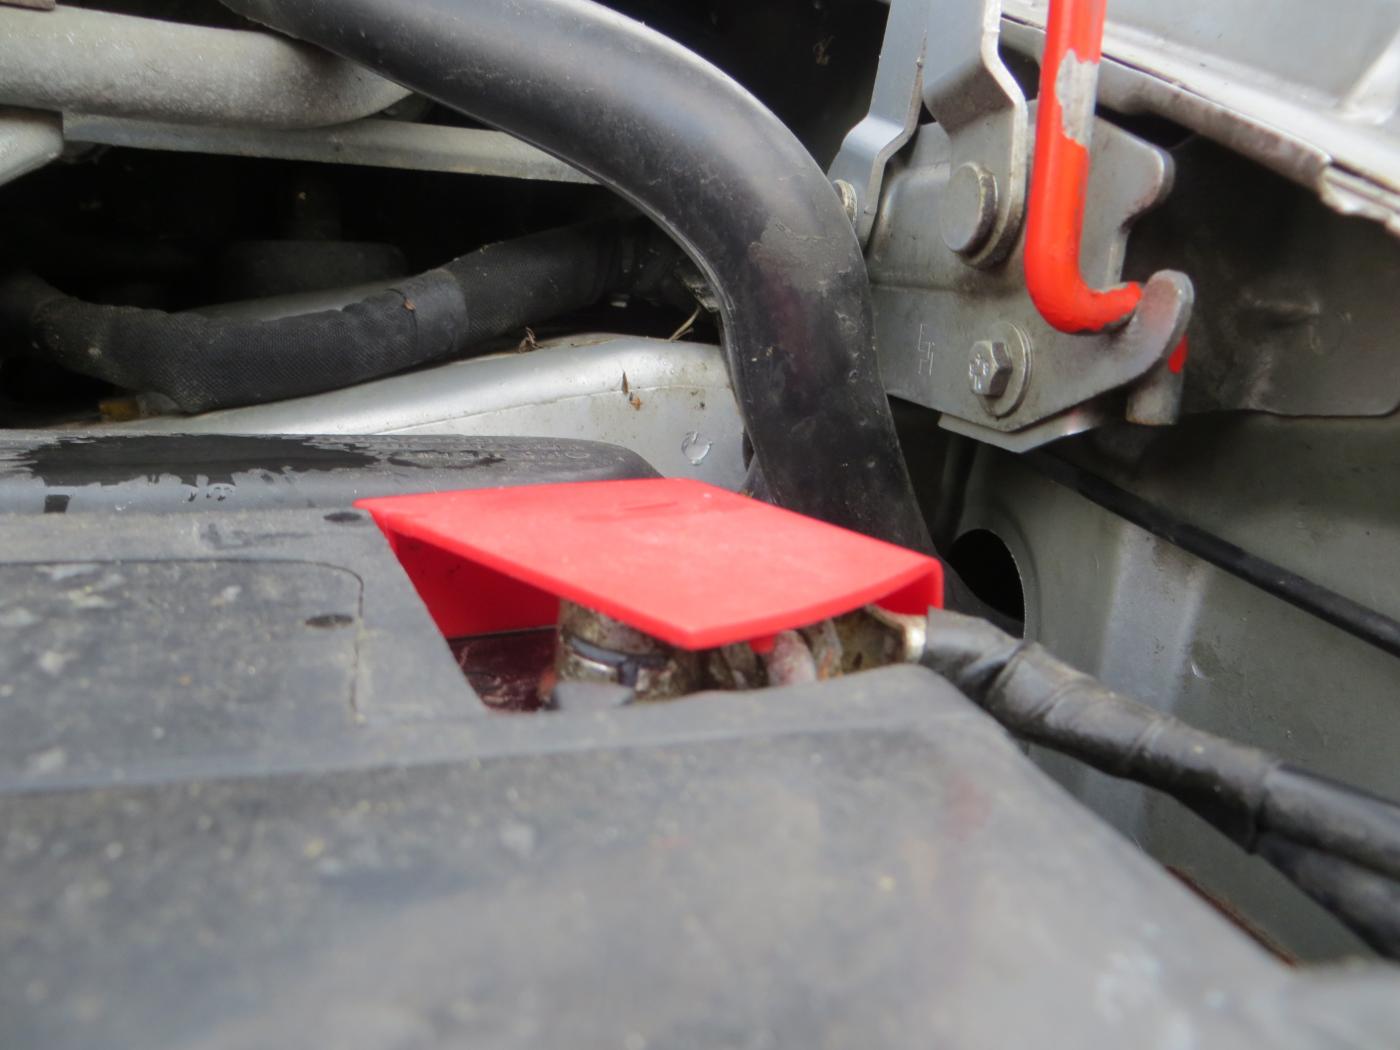
The good news is that it must be designed to be removed as the same hole next to it has the bonnet release cable going through it. So get the yellow plastic thing out of the way and there is a great route for wiring a thick gauge power cable to the battery !
#4 Re: Maintenance » How to get subwoofer power cable to battery? » 2016-02-14 19:42:15
Wondering if the yellow things may be something like this.

#5 Maintenance » How to get subwoofer power cable to battery? » 2016-02-14 12:52:52
- Gareth
- Replies: 8
I have been at this for a little while now. Trying to run a cable through the bulkhead. There are grommets where the bonnet release cable comes out. It has a spare hole but is backed by hard yellow plastic. Anyone got any experience of opening up and using these grommets. Any other solutions for getting the cable through?
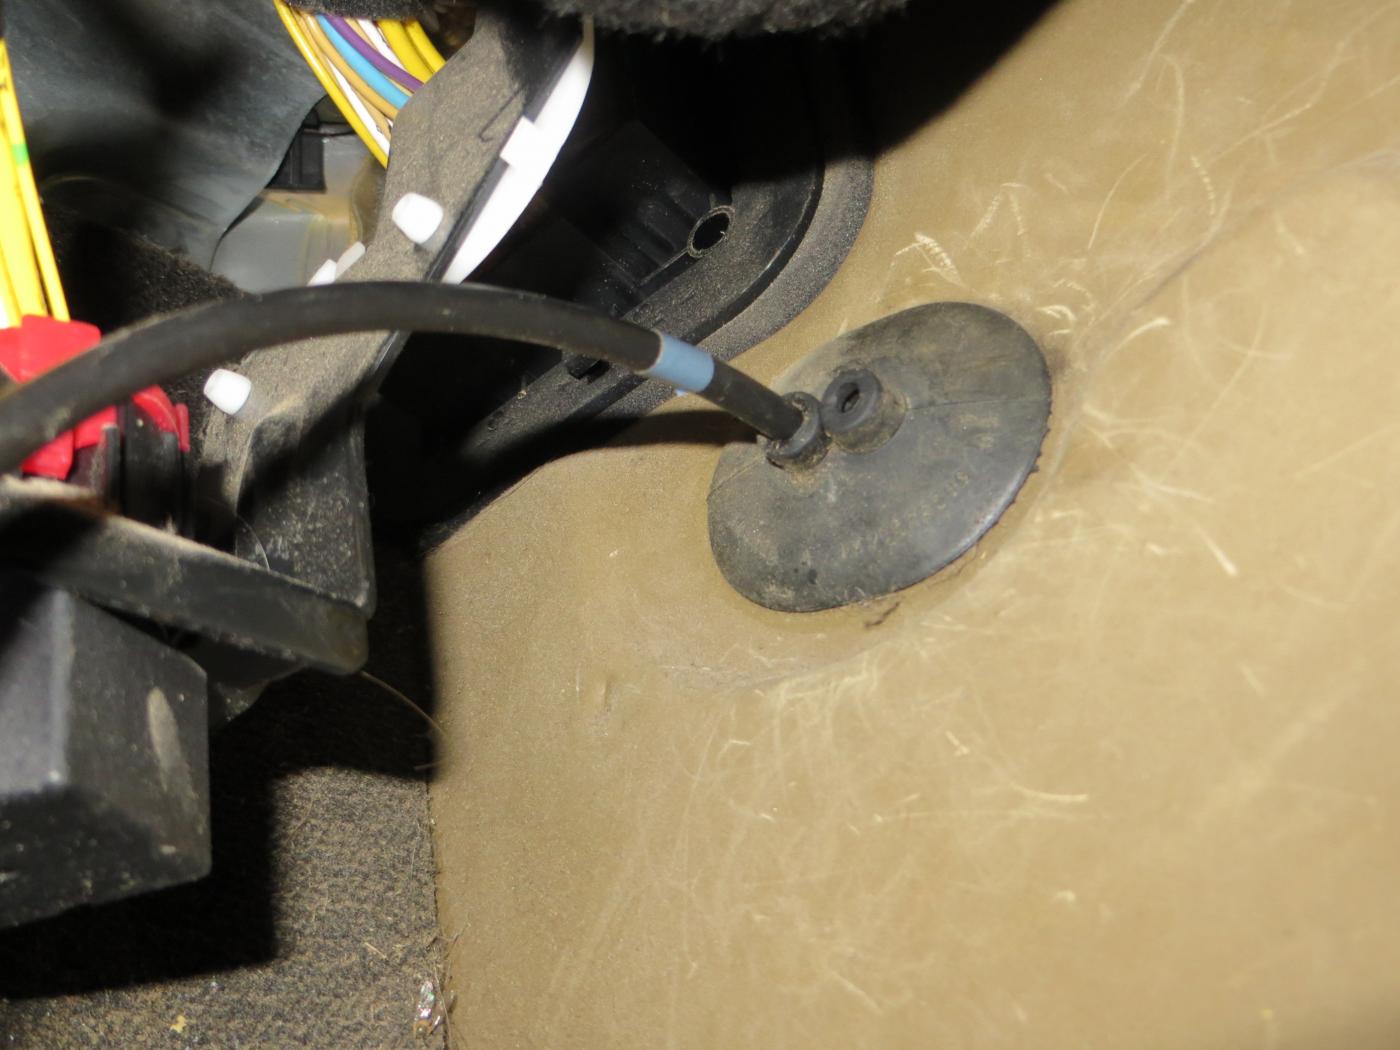
Attached is the back of the double grommet on the passenger side. You can just about see the two yellow dots. There are very hard to reach. Can they be used opened up?

#6 Re: Maintenance » Firewall » 2016-02-14 12:48:57
Casper, I am going to start a new thread with a more obvious title.
#7 Re: Maintenance » Firewall » 2016-02-14 12:14:56
There is a double grommet on either side of the van. One by the driver has the bonnet release going through it. High up on the passenger side (well and truly behind the glove box) is another. This is a photo of the back of the grommet from the engine bay. I have circled the two dots, they are yellow plastic and sealed. Seems they need to be punched out, cut or opened up somehow. They are very inaccessible. Anyone with experience of opening up these grommets? Thanks.
#8 Re: Maintenance » Firewall » 2016-02-13 15:39:34
Hi Casper. Would it be possible to explain that in more detail I don't fully understand the first part about the second firewall.
I am trying to feed through a wire to attach to the battery. Seems like a good suggestion to try and push through a length of plastic tube so I can actually get the wire through the grommet.
It seems very hard to see where the cable would come out in the cab, seems concealed behind the lump behind the battery. Hoping that if I can feed it through easily I should be able to spot it.
#9 Re: Maintenance » Firewall » 2016-02-13 14:33:08
The grommet where the bonnet release goes out has an extra hole in mine. Very nice of the people at Peugeot. I can force a screwdriver all the way through. Could not see the screwdriver in the engine bay so need to have a rummage around a try and follow the bonnet release cable back to its entry point in to the van. Anyone got any tips for that? Seems very hard to get to the back of the engine bay.
#10 Re: Maintenance » Firewall » 2016-02-13 12:53:25
Seems to be an reasonably easy to access grommet where the bonnet release cable goes out. How do I tackle the grommet? Just push through with a screwdriver or try and pop it out of the hole?
Cheers
#11 Maintenance » Firewall » 2016-02-13 12:19:26
- Gareth
- Replies: 10
Hello
I am installing an active subwoofer in my 2001 Expert. Any tips on getting a cable through the firewall and to the battery would be much appreciated.
Cheers
Gareth
#12 Re: Maintenance » Heater Control Panel Removal » 2016-02-13 12:16:44
I just changed the resistor that sits under the fan. Easy enough to do. Works a treat.
Here is the part I brought
http://www.ebay.co.uk/itm/361291489818? … EBIDX%3AIT
Let me know if you want any help with it.
#13 Re: Maintenance » Heater Control Panel Removal » 2016-01-30 17:15:33
So I will buy a new resistor and fit it. It sits in the same housing as the fan, I read this is to keep the resistor as cool as possible as it gets warm. Hopefully it will be straightforward. Thinking about a way to repair those broken controller stalks now. Maybe a strong solder as the metal seems fairly soft.
I am a Brit living in Sweden. My Swedish is not good enough when things get technical.
#14 Re: Maintenance » Heater Control Panel Removal » 2016-01-30 15:45:35
You might want to check your relay as well before pulling everything apart....
#15 Re: Maintenance » Heater Control Panel Removal » 2016-01-30 14:45:20
Well I learnt alot. Not to bad pulling it all apart if you are in the mood.
Read a little about resistors here
http://www.resistorguide.com/applicatio … -resistor/
Found replacement resistors for £25 on eBay.
How annoying the slider button stalks snap off so easily. Any tricks to fix/ ugrade those?!

#16 Re: Maintenance » Heater Control Panel Removal » 2016-01-30 13:42:16
Need a new one then. Explains why the last seller took it out and never replaced it!
#17 Re: Maintenance » Citroen Dispatch stereo wiring » 2016-01-30 10:25:58
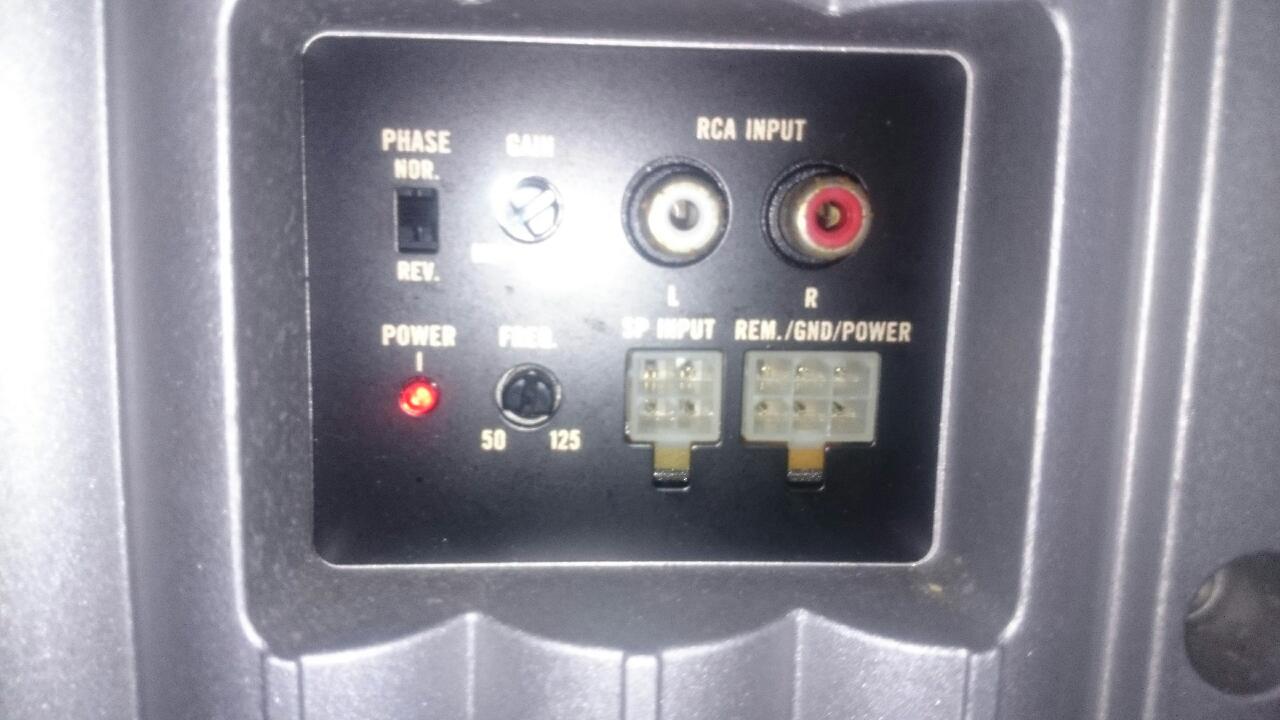
Could anyone kindly tell me the steps to wire in this sub? I know it is probably simple. I have a 2002 Expert. Guess I just need to run off the two box connectors, 4 pin and 6pin.
Would I wire it in as a "rear" set of speakers so I could control the volume sent to it?
#18 Re: Maintenance » Heater Control Panel Removal » 2016-01-30 09:31:16
I have just put the resistor back in. Seems that this might be the root of the problem. It does not switch off completely, unless the fan is always moving when the slider is to the left. I made a video. Should the fan stop completely when the slider is to the left? Works beautifully otherwise!
#19 Re: Maintenance » Heater Control Panel Removal » 2016-01-29 17:06:46
I am with you Casper. There are no additional cables coming out of the feed that goes into the back of the heater. The previous owner must have just wired into the feed lower down. The fan has been working with this DIY switch the previous guy put in so I am hoping the problem is the slider switch and this will be resolved when fitting the new unit tomorrow. Fairly straight process so far.
I will take a look at the wiring diagrams. Cheers.
#20 Re: Maintenance » Heater Control Panel Removal » 2016-01-29 15:26:01
Also two screws under the steering wheel next to the fuses and one screw just below the gear lever. Plus one screw tucked behind the fuses. After that the panel comes off easily. This is all starting to go according to plan. Question to anyone that can help on the wiring. I have attached a picture of the cable plug that is in the back of the unit. Does this look correct or is there a couple missing?
The previous owner put a manual switch for the heater on a seperate cable feed that I have also pictued. Is this just a secondary feed and no longer of use or does it need to be wired back on to the plug that goes in to the back of the heater? Many thanks.


#21 Re: Maintenance » Heater Control Panel Removal » 2016-01-29 15:17:20
Yes. I think the lower panel needs to come out. Have found two screws for that each side of the heater, three screws in the glove compartment and it appears there is one screw tucked in the corner under the glove compartment. That is all I can see. Will have a tea break and then try and pop out the lower panel. Will keep you posted.
#22 Re: Maintenance » Heater Control Panel Removal » 2016-01-29 14:13:34
 Great. I have managed to get the fascia off. Fairly straight forward. Now I need to try to get the backend box of the heater control unit out. I know it will be attached at the back to the levers for vents etc. Any ideas? Do I have to go the whole hog and take the grey lower dash panel off. It kinda looks that way.
#23 Maintenance » Heater Control Panel Removal » 2016-01-29 11:20:28
- Gareth
- Replies: 25
Hello
I have a 2002 Expert and the heater on off control slider has stopped working. The previous owner has attached a manual on off switch as a fix but this is not suitable.
I have a replacement heater control unit and I wanted to ask the steps for removing the old one as well as wiring the power back to the fitted slider on the unit.
It looks like the heater control has a box on the back that needs to be connected up first before fitting the fascia.
Many thanks
Gareth 
Pages: 1