The Dispatch | Expert | Scudo Hub
Get help & share your Citroen Dispatch (Jumpy) | Peugeot Expert | Fiat Scudo tips
You are not logged in.
- Topics: Active | Unanswered
Pages: 1
#1 2016-05-04 10:29:09
- tezla7
- Member

- Registered: 2016-01-27
- Posts: 15
Screwing in floor
Hi all,
Conversion coming on ok. Got a question about screwing in the floor without puncturing the break lines, handbrake or fuel tank. Any good tips or possible maps of the underside vulnerable parts?
Is there a best way to do this? And what size screws going through 9mm would you recommend. Cheers- this is one I haven't been looking forward to.
Will
Offline
#2 2016-05-04 10:39:35
- Tiree
- Administrator

- From: Galloway
- Registered: 2013-09-20
- Posts: 336
Re: Screwing in floor
Hey Will,
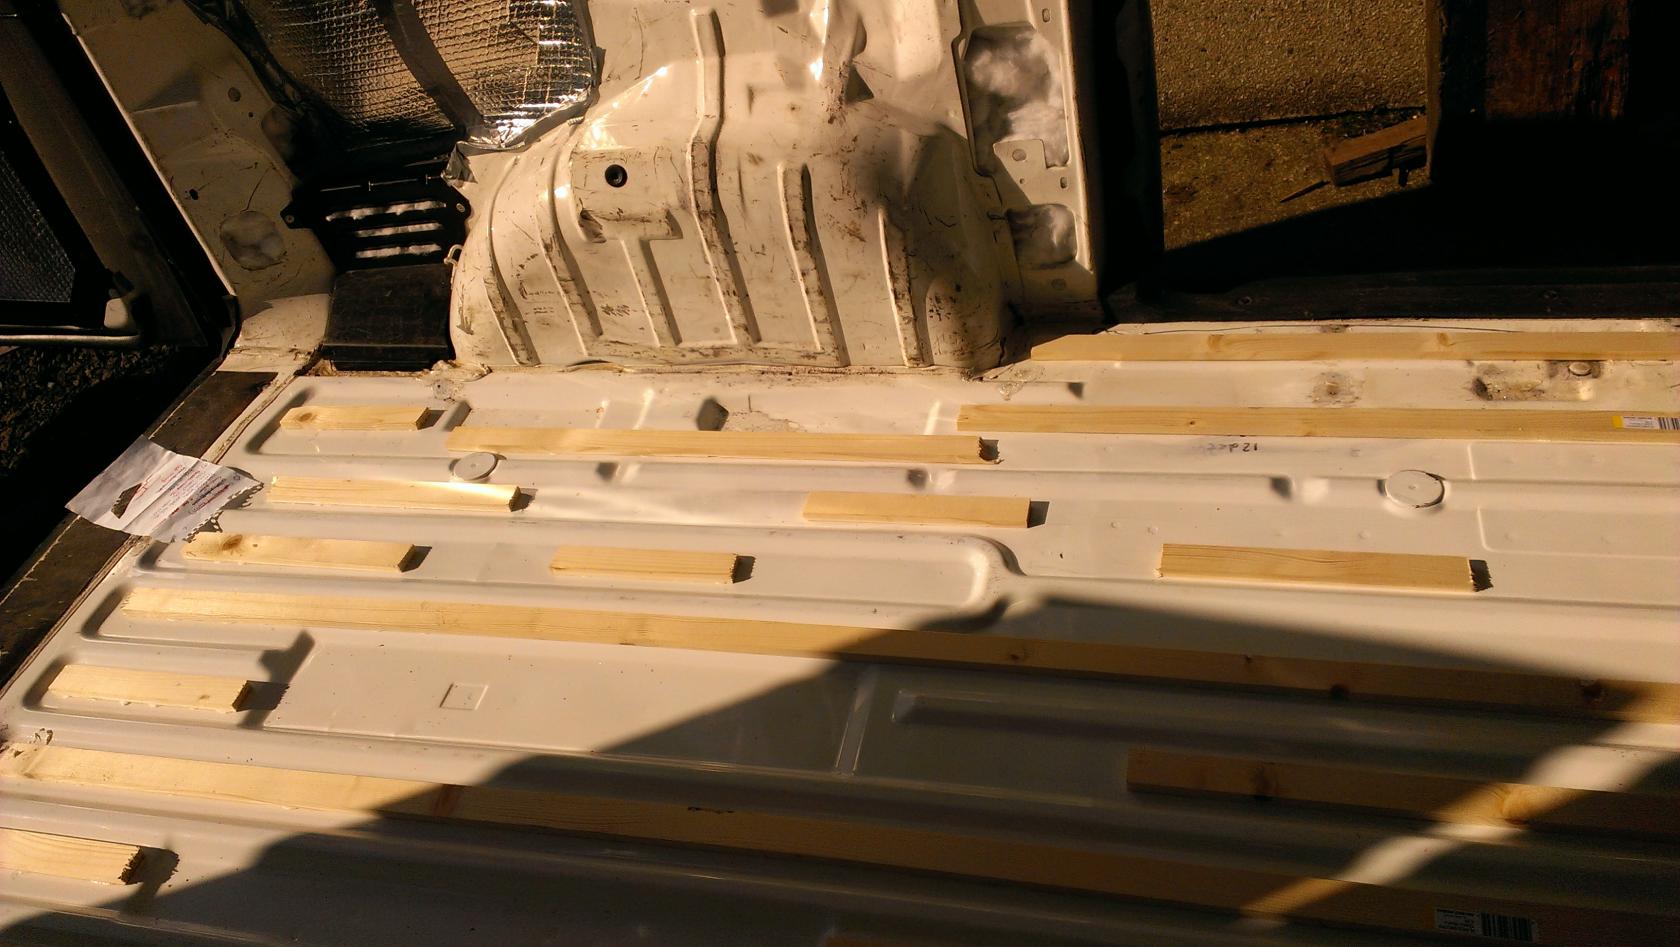
I wanted to avoid drilling through the floor at all - so glued a bundle of battens to it (added insulation on top) and then drilled / screwed into those instead.
Dead easy. Did the same with the ceiling.
2006 Citroen Dispatch 2.0HDi bought in July 2013 - Partial camper conversion ........

Offline
#3 2016-05-04 11:13:44
- goody33
- Member

- Registered: 2015-12-24
- Posts: 63
Re: Screwing in floor
I bonded the ply to the floor in the back of our van. Did it before on my VW T4 and it was brilliant. Used a product called stixall.
Offline
#4 2016-05-04 11:38:52
- Casper
- Member

- From: East Lothian
- Registered: 2015-12-20
- Posts: 2,181
Re: Screwing in floor
From what i can work out see the plastic round cap in that picture? You have four in the rear. That is the support beam that runs up under the van with nothing inside it so that area should be safe.
I did not bother. Laminate is screwed onto the ply but the rock n roll bed goes through the floor-laminate and ply at the rear of the van with two 10mm bolts. That should be enough to hold the lot in place. I dropped the spare wheel before drilling through. Did not need to bother as the bloody thing is flat anyway 
BTW people. I am after a set of 306 wheel trims for the van 14" i think.
Offline
#5 2016-05-04 18:25:58
- tezla7
- Member
- Registered: 2016-01-27
- Posts: 15
Re: Screwing in floor
Cheers Guys,
Everything is taking ages and I'm getting impatient with things, sometimes I just think "sod it, crack on". I'd already insulated the floor with thermawrap so couldn't be bothered to take it all up again, wipe off all anti-rust stuff and glue down battons, then put it all back etc. Instead I marked out where the upper ridges of the floor were and screwed short countersink self tappers. Battons definitely looks like the proper way to do it. I'll take that approach on the ceiling as I was wondering how that was going to go. Seem to be finding a pattern emerging- as soon as I lose patience and say "sod it, crack on"- things go wrong! Nevermind, I've done a good job of making Swiss cheese out of my floor and managed to make it home without losing the breaks or fuel tank so maybe I got away with it.
Offline
#6 2016-05-04 18:40:36
- Casper
- Member
- From: East Lothian
- Registered: 2015-12-20
- Posts: 2,181
Re: Screwing in floor
So what you doing for the ceiling? Before i managed to get a taxi lining i was going to use hardboard. You see you have a lip on the sides where the roof meets the walls. If the distance is 4.5 foot then cut a sheet to 4.6 foot and it would pop inplace. May need to adjust the measurement but it would work. If you do something hanging then you are reducing the head height.
Offline
#7 2016-05-04 20:46:22
- tezla7
- Member
- Registered: 2016-01-27
- Posts: 15
Re: Screwing in floor
Celiing- Similar for what I've done/doing on the walls- thermawrap, cellotex (25mm for ceiling) thermawrap and then hardboard plywood. Yeah, wondering how it's going to go in the corners, whether to have the walls go to the top and do the ceiling a bit shorter or the walls a bit shorter and the ceiling a bit longer on the overlap...if that makes sense. See what happens, don't suppose it's too critical which overlaps which.
Offline
#8 2016-05-05 05:11:01
- vaz2121
- Member

- From: Glasgow Living:~ SW. Scotland
- Registered: 2015-08-31
- Posts: 1,311
Re: Screwing in floor
Here's couple photos
This is how our ceiling looks
I'd say it's thinish ply and about 20-25mm insulation roughly, as the batons that the Sky light is fixed to and also the roof straps/strengtheners are about that and the whole lot is flush with cab headlining
I don't think it can be far off Casper's description
A comparison Photo to what I mean, Which I snaffled of another Dispatch

Last edited by vaz2121 (2016-05-05 05:43:34)
Offline
#9 2016-05-06 11:57:10
- tezla7
- Member
- Registered: 2016-01-27
- Posts: 15
Re: Screwing in floor
That's a nice neat job. I also like the idea of keeping the rear side light as a mate just gave me LED bulbs for those and they work well.
Offline
Pages: 1