The Dispatch | Expert | Scudo Hub
Get help & share your Citroen Dispatch (Jumpy) | Peugeot Expert | Fiat Scudo tips
You are not logged in.
- Topics: Active | Unanswered
#1 2022-06-20 19:48:08
- Jimt1688
- Member

- From: Plymouth
- Registered: 2021-10-11
- Posts: 6
Wiring loom engine bay to fuse box - has anyone got one?
Hi,
I need a front wiring loom - the large one that runs through the passenger bulkhead to the dashboard fuse box (with the large rubber donut) for a mk1 Citroen despatch (2004).
Do you have one? If so how much to post to Devon?
Cheers
Jim
Offline
#2 2022-06-20 22:56:40
- JohnDragonMan
- Member

- From: Derby, East Midlands, UK
- Registered: 2020-06-02
- Posts: 456
- Website
Re: Wiring loom engine bay to fuse box - has anyone got one?
ive not got one, but what engine is it for?
i did have all of that out on my HDI when i retrofitted aircion.
Last edited by JohnDragonMan (2022-06-20 22:57:06)
- JohnDragonMan
Notice: I have the tendency to void warranties, blow fuses, cause fires, and other fun stuff.
Words of wisdom: Internally rust proof the sills and subframe! both skins!!. There's always user serviceable parts inside. "Oh that shouldn't have happened".
My 2005 Dispatch Camper Project 
Offline
#3 2022-06-21 06:29:55
- Jimt1688
- Member
- From: Plymouth
- Registered: 2021-10-11
- Posts: 6
Re: Wiring loom engine bay to fuse box - has anyone got one?
Hi John,
It’s 1997cc diesel (Dispatch 900 Enterprise). I used your YouTube video to take all the dash out to get at the bulkhead connection - very useful.
Cheers
Jim
Last edited by Jimt1688 (2022-06-21 10:56:34)
Offline
#4 2022-06-21 14:02:33
- JohnDragonMan
- Member
- From: Derby, East Midlands, UK
- Registered: 2020-06-02
- Posts: 456
- Website
Re: Wiring loom engine bay to fuse box - has anyone got one?
Hey same van as mine!
If you have it all out, can you just not cut and solder new wires in if some are damaged?
They are all coded and coloured which helps loads.
- JohnDragonMan
Notice: I have the tendency to void warranties, blow fuses, cause fires, and other fun stuff.
Words of wisdom: Internally rust proof the sills and subframe! both skins!!. There's always user serviceable parts inside. "Oh that shouldn't have happened".
My 2005 Dispatch Camper Project
Offline
#5 2022-06-21 18:11:40
- Jimt1688
- Member
- From: Plymouth
- Registered: 2021-10-11
- Posts: 6
Re: Wiring loom engine bay to fuse box - has anyone got one?
I could but the damage is pretty extensive and I was hoping for an easier way out. Do you know how easy/difficult it is to detach that part of the loom from the engine bay end? Everything is disconnected inside the vehicle. Then perhaps I could lock myself in the garage for a few weeks with my soldering iron and some heat shrink. I don’t want to do in situ because it’s on the drive and I know that everyone who walks past will stick their head in the bonnet and offer they’re two-penneth.
Regards
Jim
Offline
#6 2022-06-21 23:12:13
- JohnDragonMan
- Member
- From: Derby, East Midlands, UK
- Registered: 2020-06-02
- Posts: 456
- Website
Re: Wiring loom engine bay to fuse box - has anyone got one?
ahh thats where not having many friends comes into play. well none that live local to me heh
so from the engine bay side you would have to take appart the fuse box i think, i never saw any plug that the fuse box plugs into. the engine should be on one convenient plug. the ECU wiring is all one length too.
the good news is that not may "important" (as in running the engine) wires go through that connector as well theres not many engine running wires on this van. the thing starts and drives without the whole dash in.. just needs the key held up to the transponder/RFID loop antenna.
so.. how bad is it? i am guessing a fire? blower motor? just guessing here. i totally rewired my blower motors as i didnt rate: A, the connectors. B, the wire thickness. C, the way the speed controllers were wired in.
i have mine running through 2x linked PWM controllers driven from the original speed slider bypassing the built in speed controllers on the motors. it does not even get hot!(as its rated at like 120 amps lmao) its a bit noisy on the HF band though below 30MHz... even with lots of extra and more RF filtering.
it looks like a lot of wires go through that gromet but its not that bad.. best thing if they are melted is usually the copper has not broken so you can pick through the burnt mess and trace every wire back to a good bit then run a new length.
you should see the stuff i have rewired in the past.. its not hard to do just a bit time consuming. heh bit of a nightmare for the next guy.. i used the same wire colour for all the repairs lmao
still never had anything fail again. chafing and wire thats too thin.. and sometimes boy races that like to run a non fixed down sub with powered amp wires through the door (not the bulkhead) without a fuse yet have it zip tied to the ECU wiring.. sigh. when they turn a corner it always finds that one bit of uninsulated metal grounding and that nice 250A wire turns into a light bulb filament running under the carpets.. hey i was a passenger when it happened once! locked the guys alternator up solid! had to drive it back with no belt on. ahh fun times.
anyway.. upload a photo, lets see how bad it is. shame your not local.. i quite enjoy wiring/brake line jobs.
Last edited by JohnDragonMan (2022-06-21 23:16:58)
- JohnDragonMan
Notice: I have the tendency to void warranties, blow fuses, cause fires, and other fun stuff.
Words of wisdom: Internally rust proof the sills and subframe! both skins!!. There's always user serviceable parts inside. "Oh that shouldn't have happened".
My 2005 Dispatch Camper Project
Offline
#7 2022-06-22 10:47:04
- Jimt1688
- Member
- From: Plymouth
- Registered: 2021-10-11
- Posts: 6
Re: Wiring loom engine bay to fuse box - has anyone got one?
Hi,
Hmmm, how did it happen? Loathe to reveal this because I was a twat. However, to prevent any other owners from making the same mistake - I will relate the sorry episode for you.
I was installing a split charge relay and had routed the cable up to the fuse box and needed to find the most direct route to the battery. Lots of ideas on the forum about going through the door grommets, etc, but I didn’t like the idea of a live cable being visible and going round a circuitous route to the battery. A person (who will remain nameless) suggested going through the edge of the large bulkhead grommet using the the little triangular access panel to the dash bolts.
I duly used a scriber to make a hole at the top and pushed it through to the engine bay. I am inside the van doing the pushing and said ‘helper’ is looking at the grommet from the engine bay. “It’s through” he says - what was not disclosed was that the scriber had exited at the bottom of the grommet and must have passed through all the cables. Without checking the engine bay for myself, I proceeded to enlarge the hole for the battery terminal to pass through.
Eventually, Albeit too late, I realised that something was wrong - durrrrr. I had to pull the grommet through to the inside of the vehicle and then had to carefully cut away the protective rubberised foam from around the cables. What a mess I discovered!
https://dispatchexpertscudo.org.uk/foru … DC031.jpeg
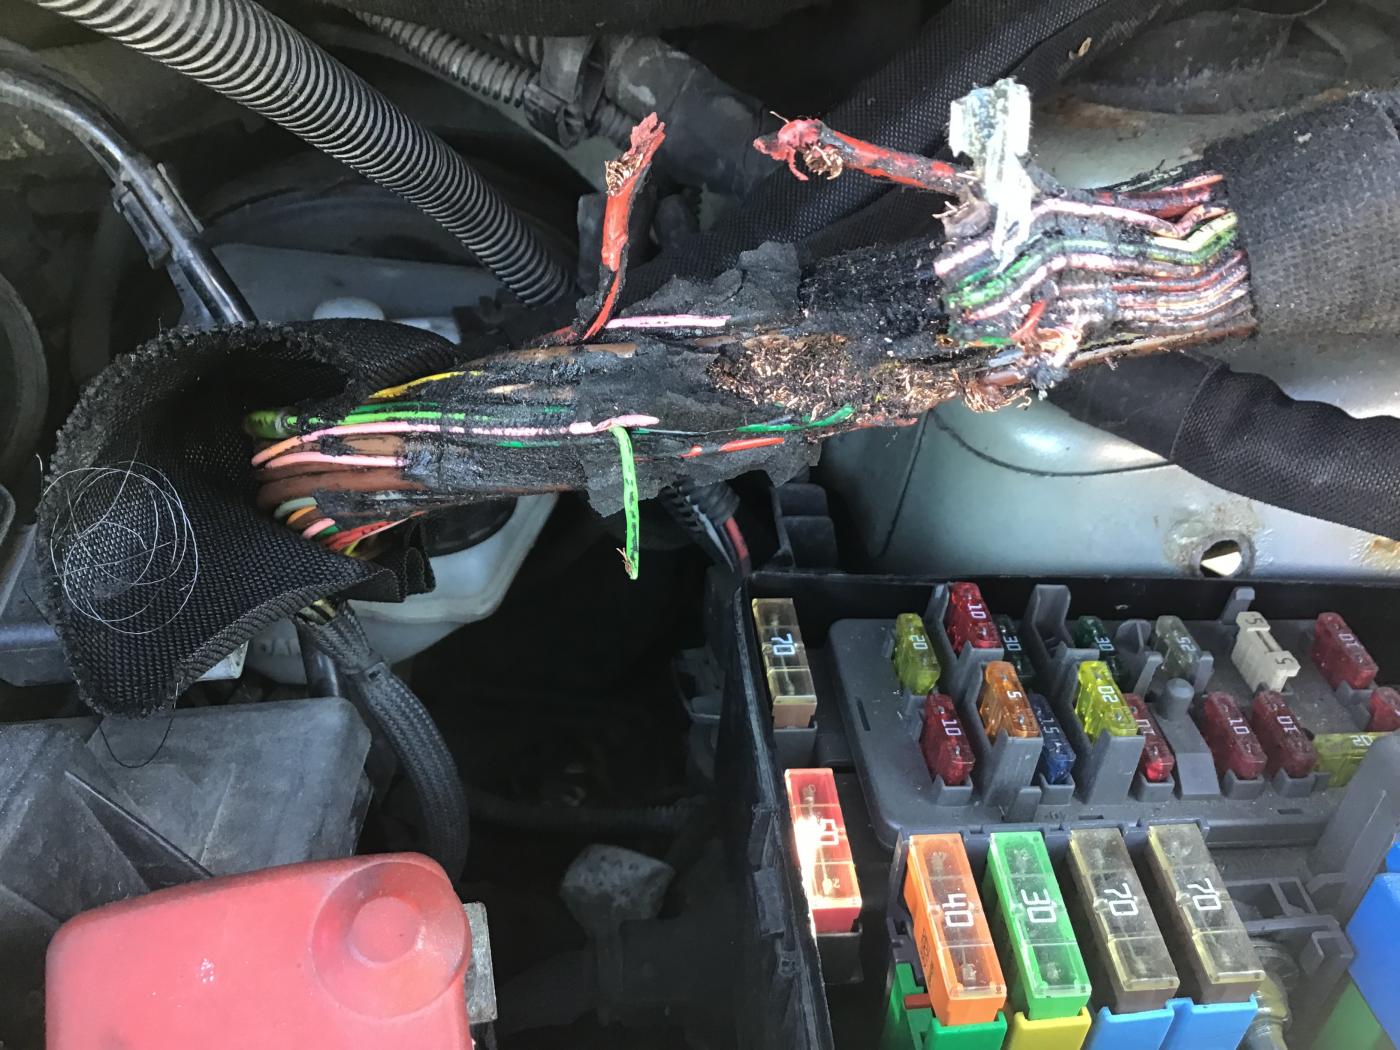
Going through the bulkhead would have been a great idea but to anyone else planning on doing this - please remove the dash to do it and you would be better off pulling the grommet through and making the hole for the split charge cable where you can see both sides of the cable and run the hole parallel to the cable run.
Like you say - it is easily doable to repair but it needs to come out in its entirety and take some time doing it. I’ll let you know how it goes over the next few weeks.
The most annoying thing was that this was the last job in my camper van conversion. The only positive from all this, is that now I can sort out the odometer lights and the steering controls for the stereo. More lessons learnt and now I know how to remove the dash.
Cheers
Jim
Last edited by Jimt1688 (2022-06-22 10:49:39)
Offline
#8 2022-06-23 01:16:56
- JohnDragonMan
- Member
- From: Derby, East Midlands, UK
- Registered: 2020-06-02
- Posts: 456
- Website
Re: Wiring loom engine bay to fuse box - has anyone got one?
ahh.. damn. its easy done but (to me) it looks like a very easy repair.. have you pulled with wires apart yet to see how many are no longer joined? you may be surprised!
now look at that photo and picture it happening with the battery still connected. thats the mess i had to repair once. it was on a bigger loom too.
at least you can match colours, on the one i fixed everything was yellow! damn military.. damn ambulances.. guhhh
hmm if you have not ran the cable yet, theres a nice grommet way up the top, almost where the wind screen is. its where i have run my battery to battery charger cable through (a 40mm cable! with some "extra" smaller/signal cables for redundancy/future add ons). it comes out just above the strut top.. not sure if theres one on the fusebox side.
right i need to sleep its been a long hot day at work.. im almost falling asleep as i type this.
- JohnDragonMan
Notice: I have the tendency to void warranties, blow fuses, cause fires, and other fun stuff.
Words of wisdom: Internally rust proof the sills and subframe! both skins!!. There's always user serviceable parts inside. "Oh that shouldn't have happened".
My 2005 Dispatch Camper Project
Offline
#9 2022-06-24 06:34:19
- Jimt1688
- Member
- From: Plymouth
- Registered: 2021-10-11
- Posts: 6
Re: Wiring loom engine bay to fuse box - has anyone got one?
Many thanks mate, I feel a lot happier about doing this. Much appreciated.
Cheers
Jim
Offline