The Dispatch | Expert | Scudo Hub
Get help & share your Citroen Dispatch (Jumpy) | Peugeot Expert | Fiat Scudo tips
You are not logged in.
- Topics: Active | Unanswered
#1 2017-08-12 11:51:37
- cliffo
- Member

- Registered: 2017-08-04
- Posts: 128
98 Scudo - Replacing a Wheel Side CV Joint - photos
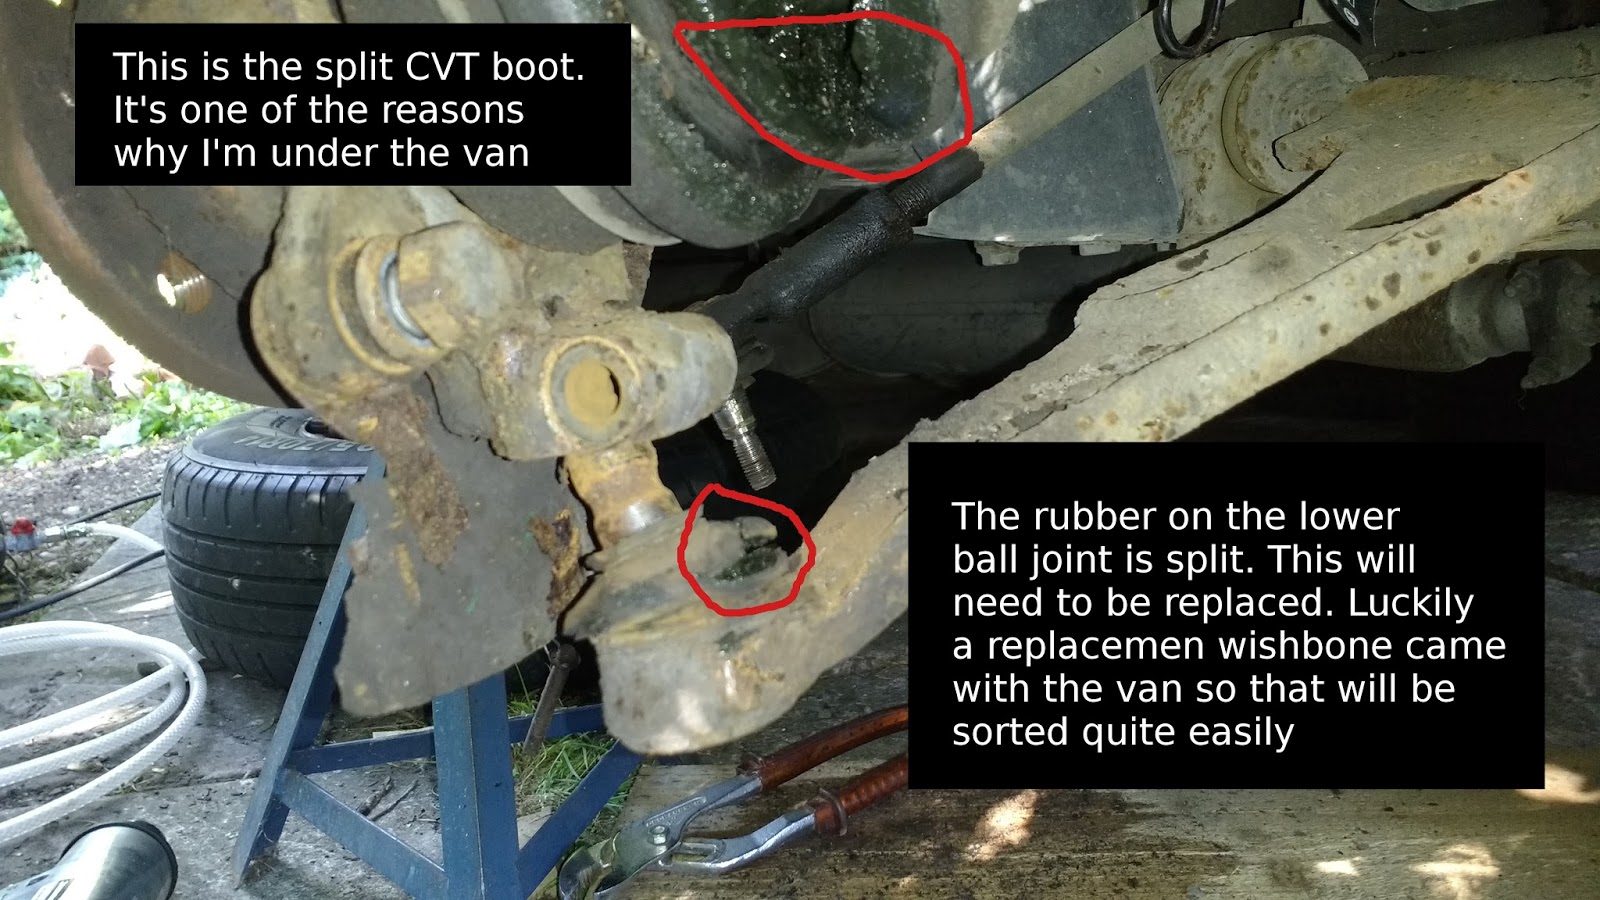
I was the lucky buyer of Monkeynut's old red Scudo. It's a great little van. Sadly it needs some work doing to get it through its MOT but I knew that when I got it. It's currently up on axle stands in the back garden whilst I take the time getting it sorted. The work that needs doing is mostly front end, CVT Boots, track rod end, lower suspension arm and corroded brake pipe.
I thought I'd take a few photos along the way with a bit of annotation. I'm also posting them in the FiatForum so there's a bit of self plagiarising going on here :-)
----------
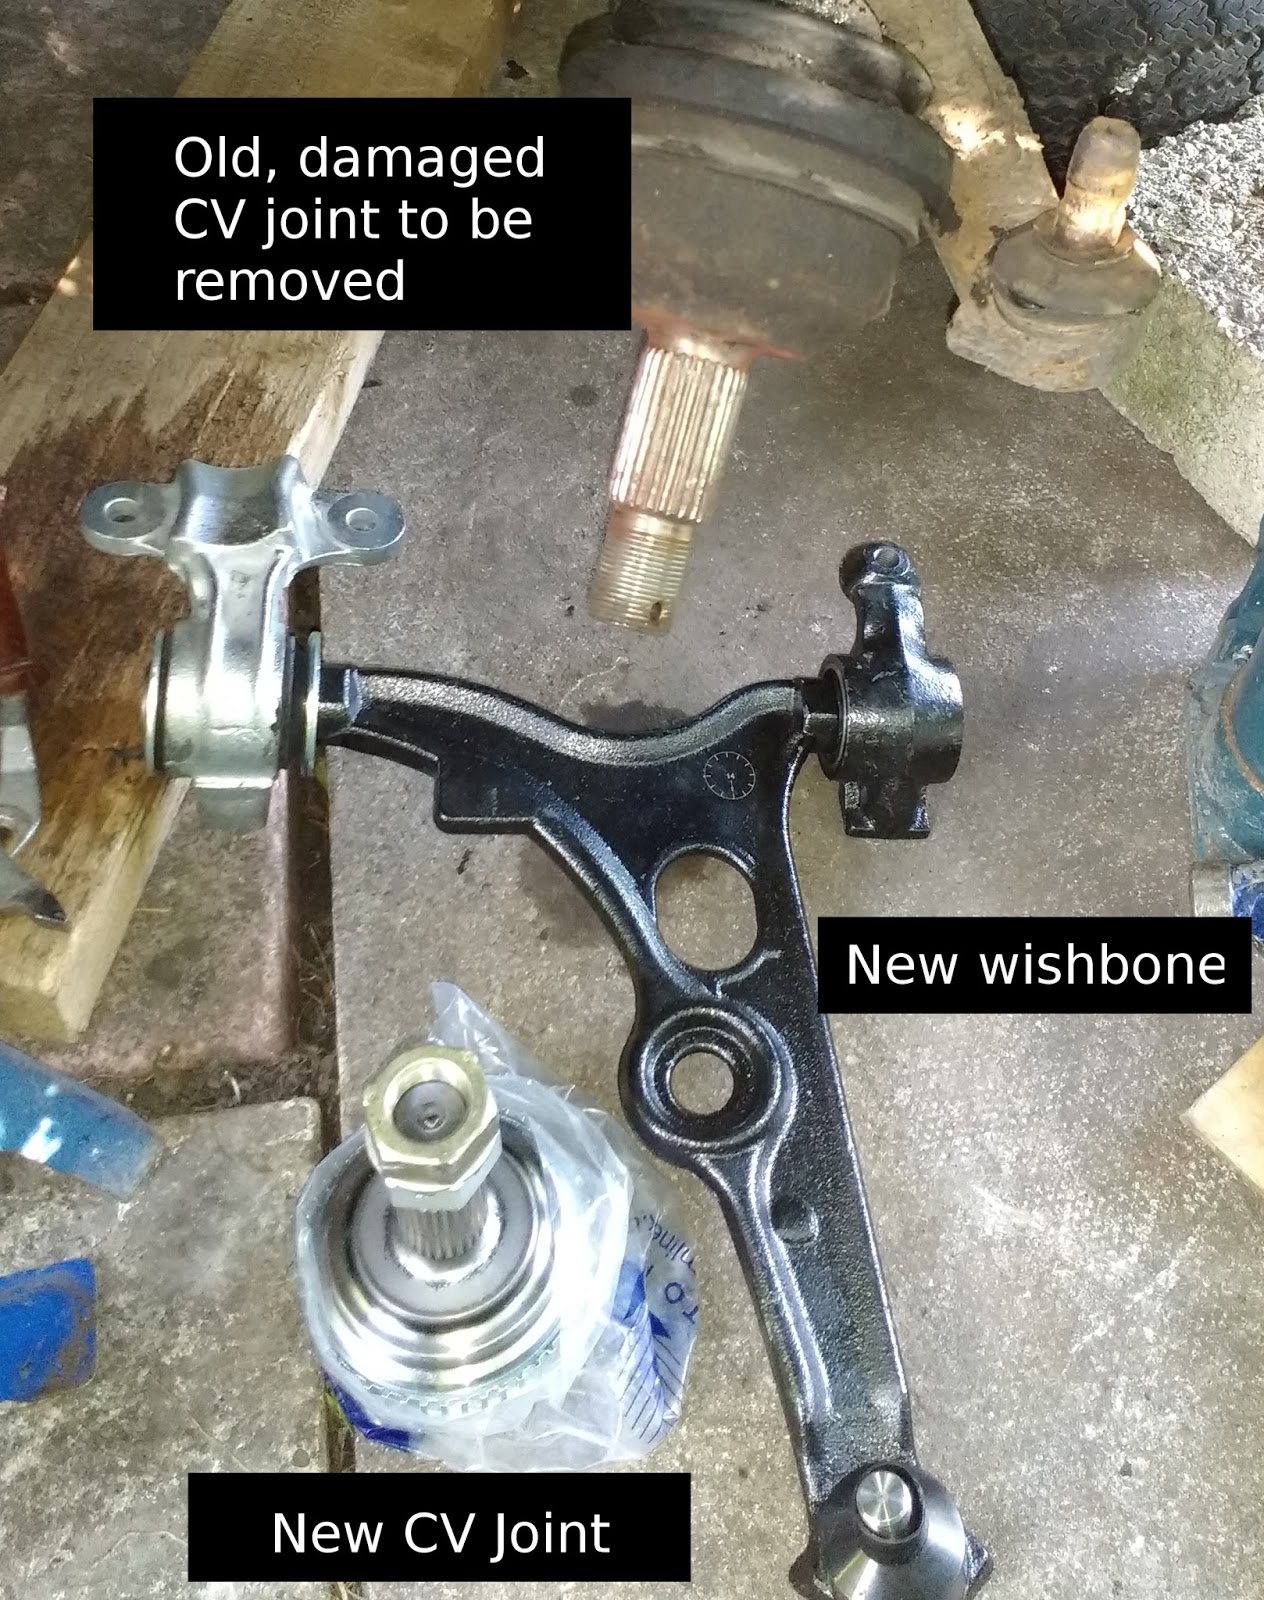
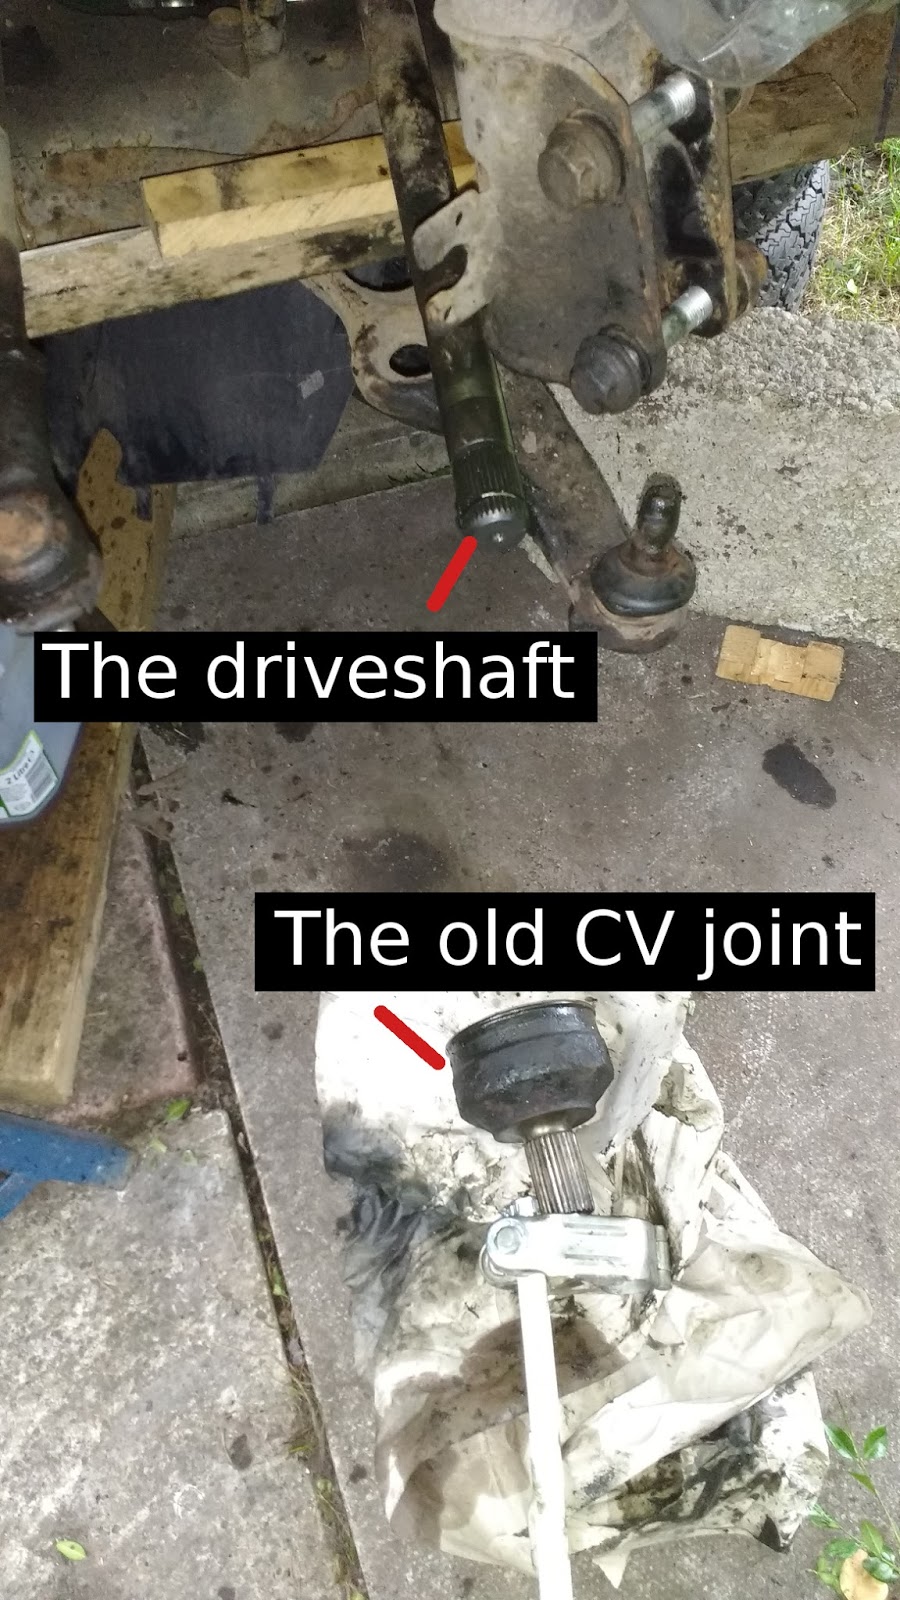
The MoT failures on my Scudo included a shredded CV boot on the Offside front. I don't know how long the boot has been ripped but I had a new joint so decided to replace the whole thing in case the original had been damaged with muck.
I'm not saying that this is the best way to do it but here's how I got the old joint off and new one (with new boot) back on.
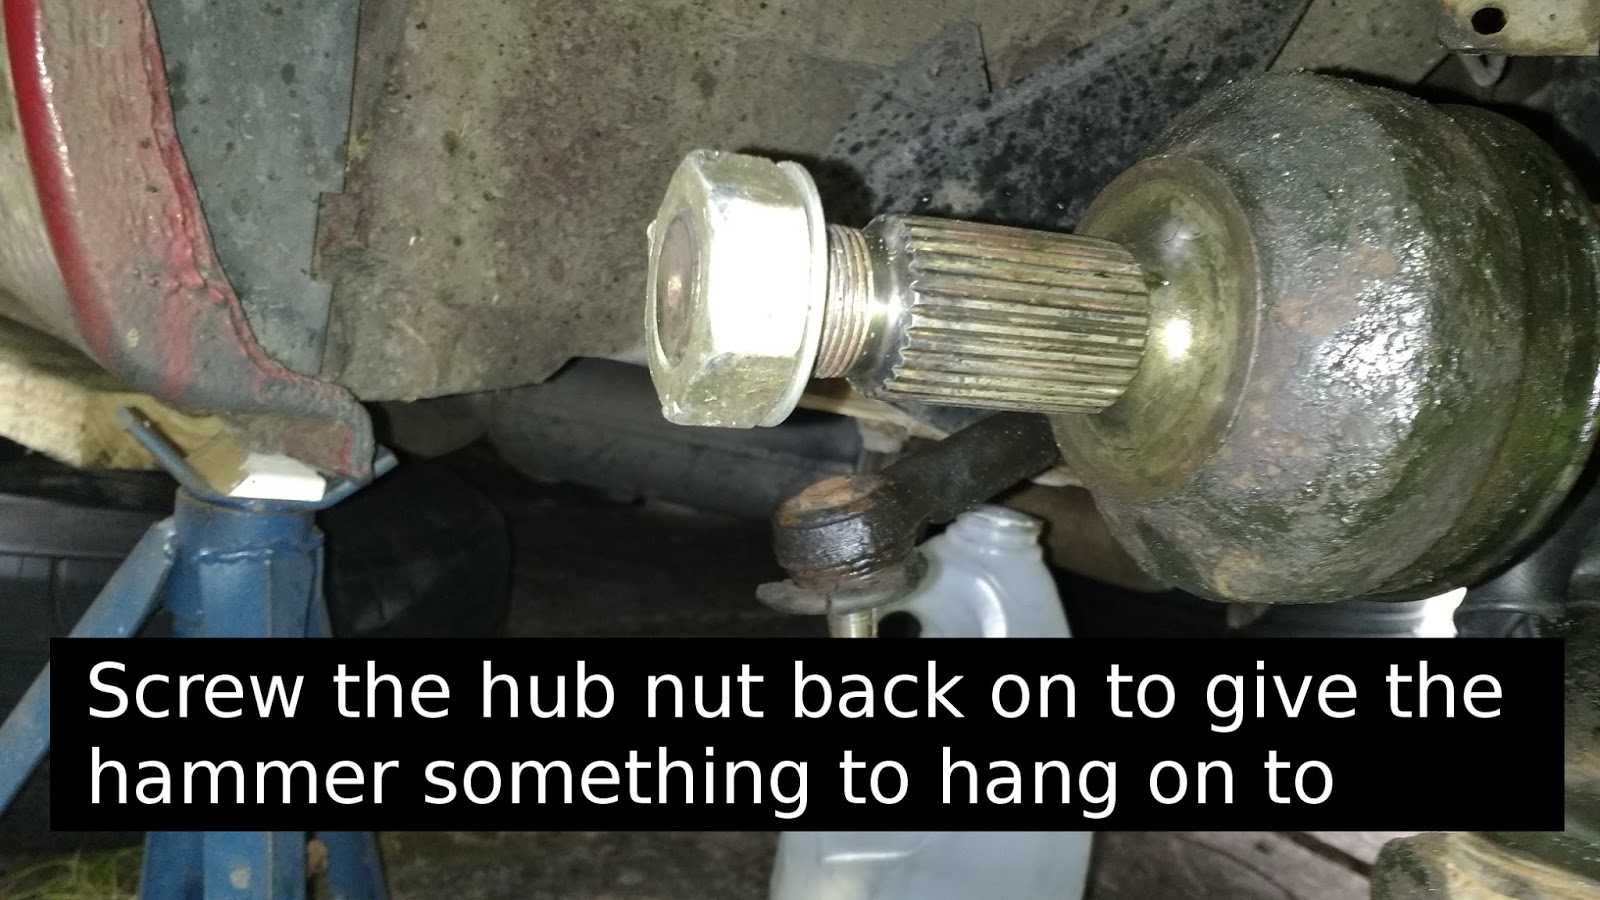
Firstly, chock the rear wheels, engage the handbrake and stick the van in first gear. Remove the hub cap, knock out the lock pin/clip securing the large (36mm) hub nut. Slacken off the hub nut and wheel nuts whilst the vehicle is on the ground.
Jack up van, either using the frontside jack point or the central support member behind the engine. Add axle stands or other *secure* methods of keeping the vehicle elevated.
Remove the wheel and place under the vehicle to provide extra 'drop protection'.
Remove the brake caliper (either tie it up so as to not strain the the brake pipe or remove it from the brake pipe completely). [Note -I have some photos of this process but cannot find them right now - will add later]
Continue to remove the pre-loosened hub nut...


Remove the track rod end (this is also to be replaced - another MoT failure)
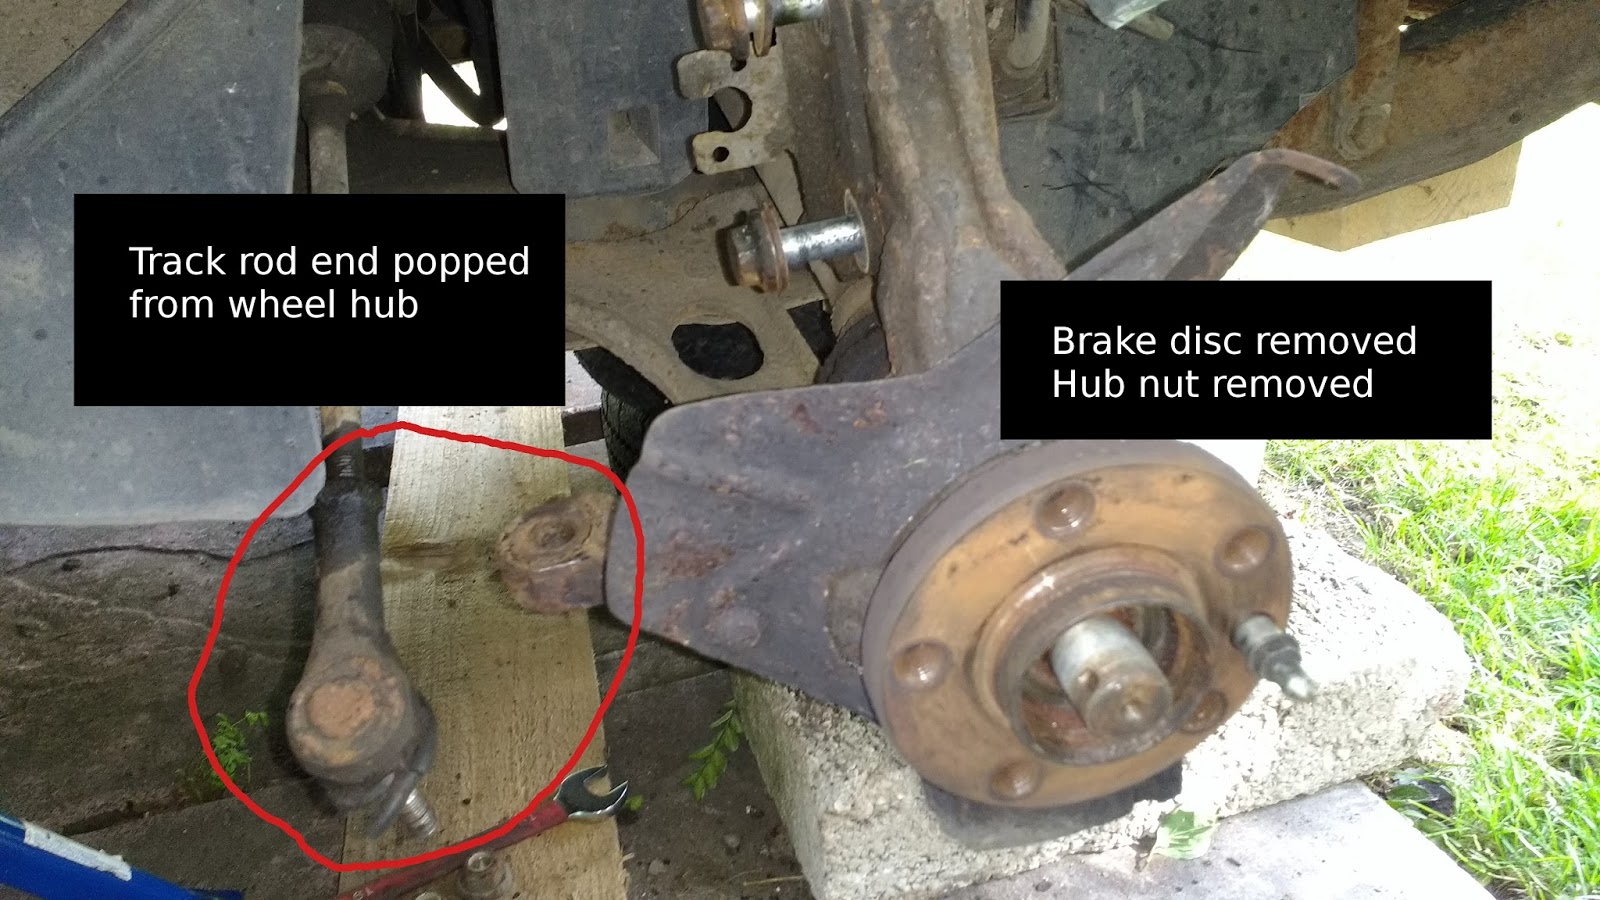
(At this point I removed the brake disc, I should have done this as soon as I removed the caliper)
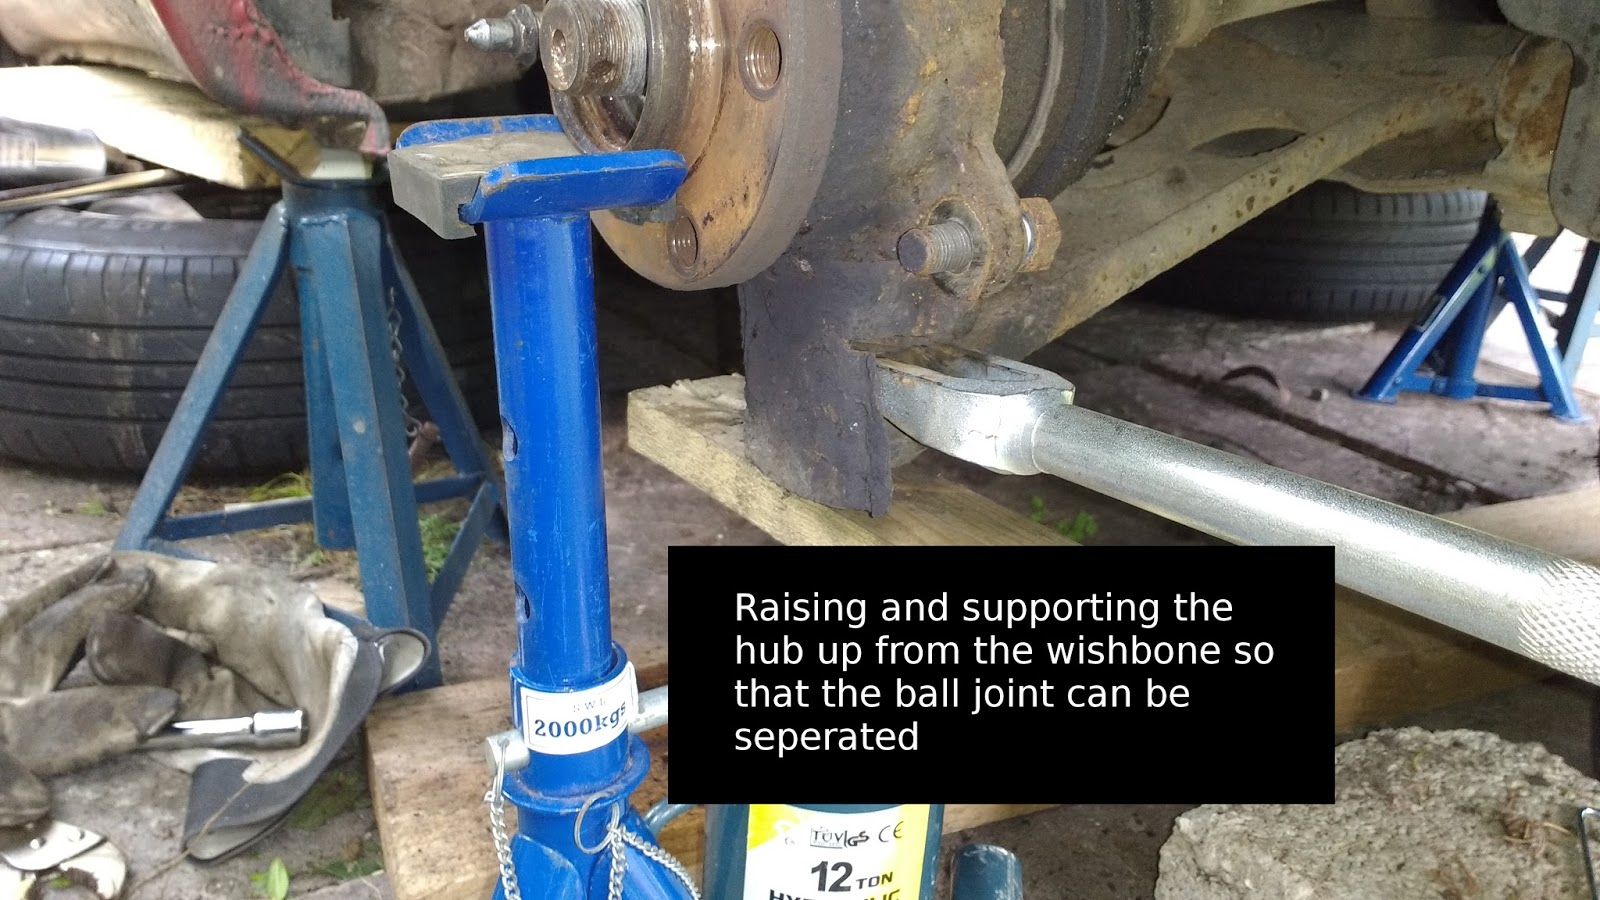
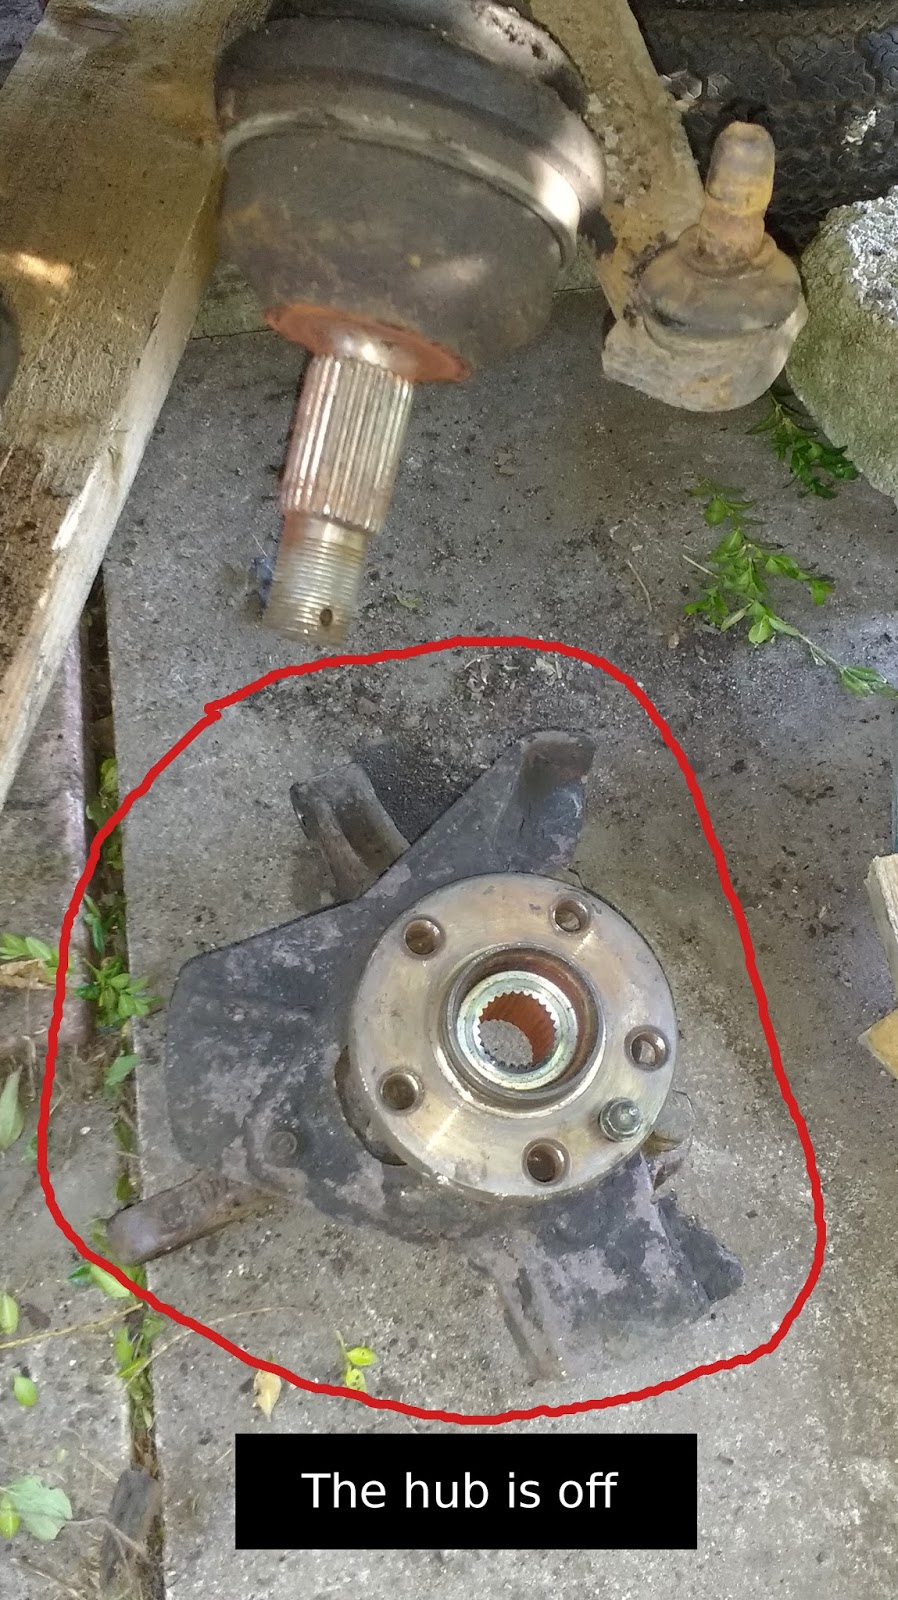
Undo the pinch bolt securing the hub assembly to the lower wishbone
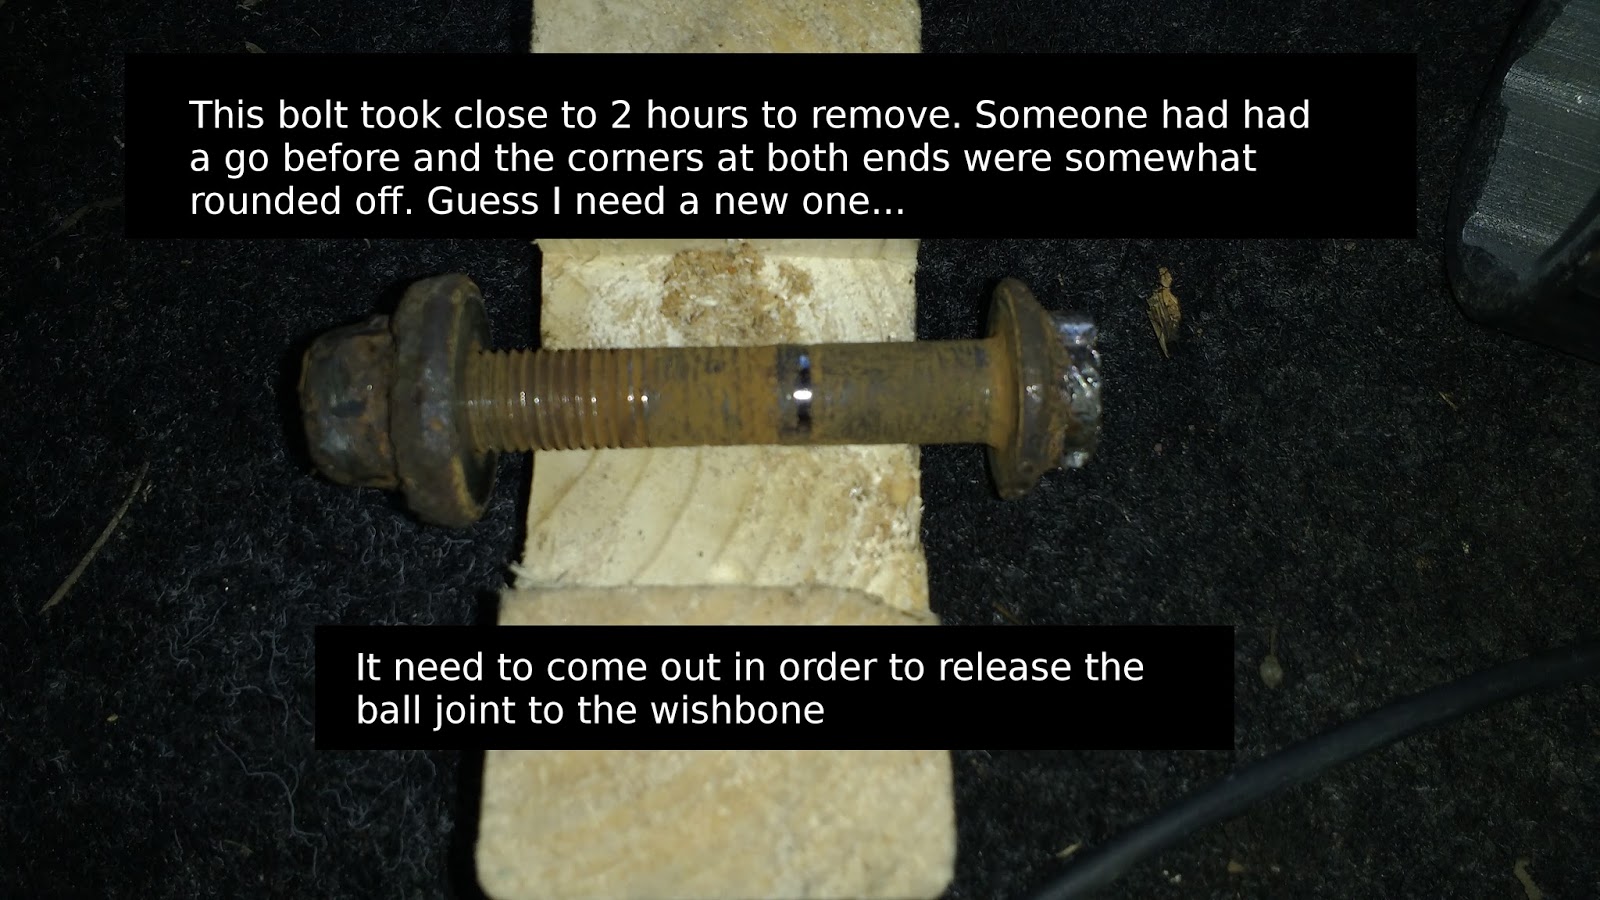
Support the hub assembly and separate from the wishbone - I used a fork-separator here because the worn rubber on the lower suspension arm is also an MoT failure so that assembly needs to be replaced and the rubber can be sacrificed.
At this point the hub assembly could be removed from the joint. If it needs some help then put the hub nut on with a couple of turns and give it a persuade with a hammer. Be careful pulling the hub assembly and pulling the drive shaft out at the same time - the driveshaft wants to stay completely located in the gearbox.
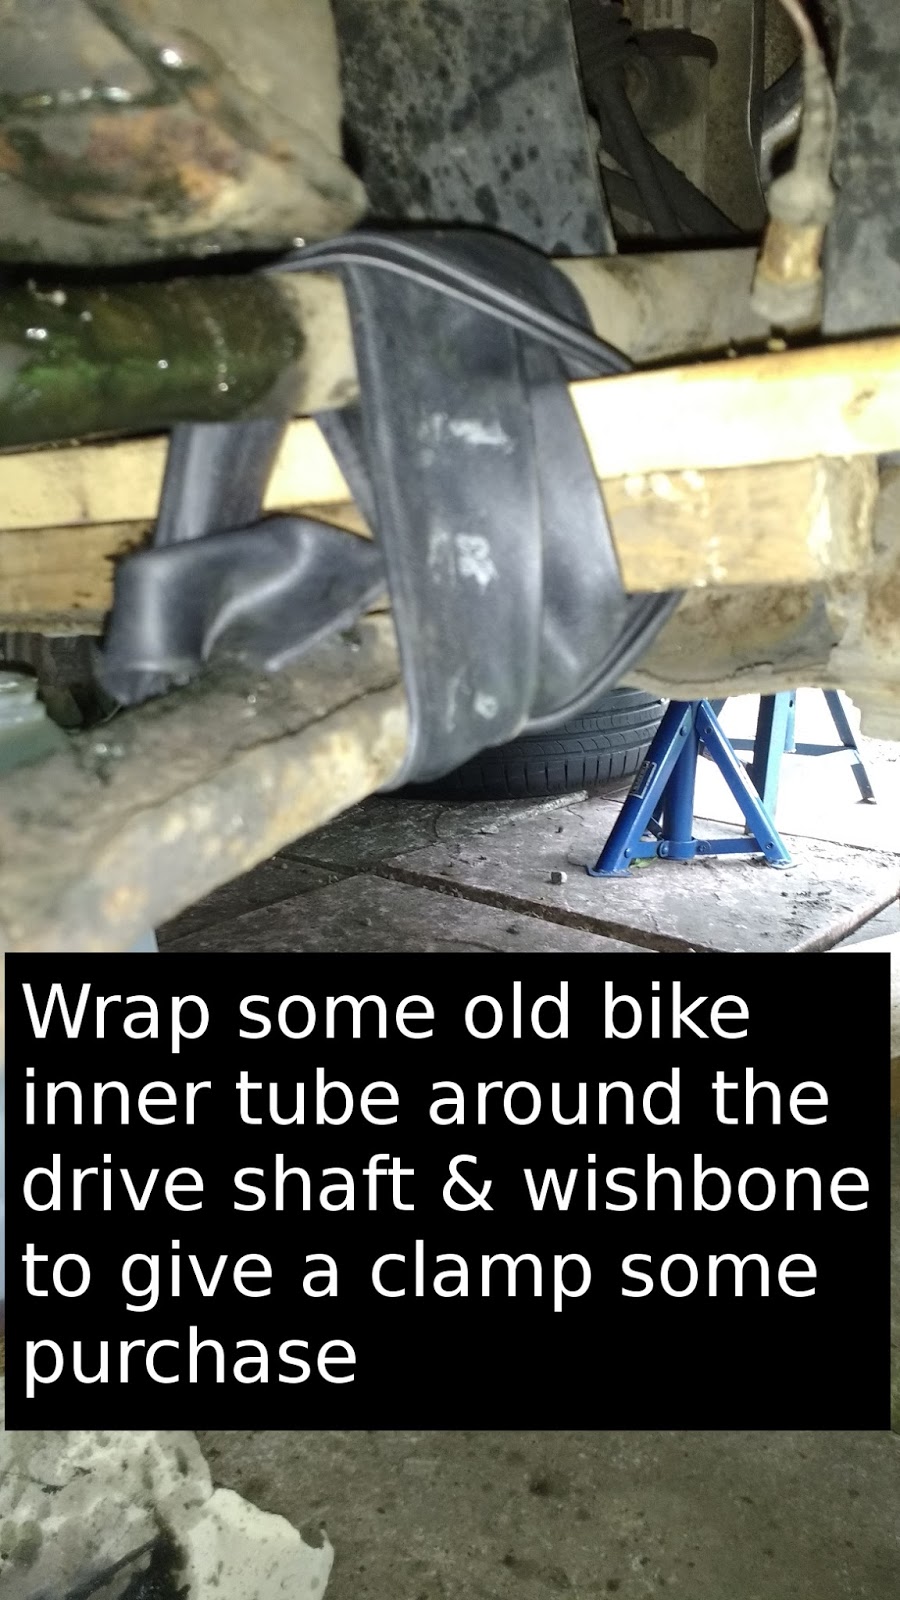
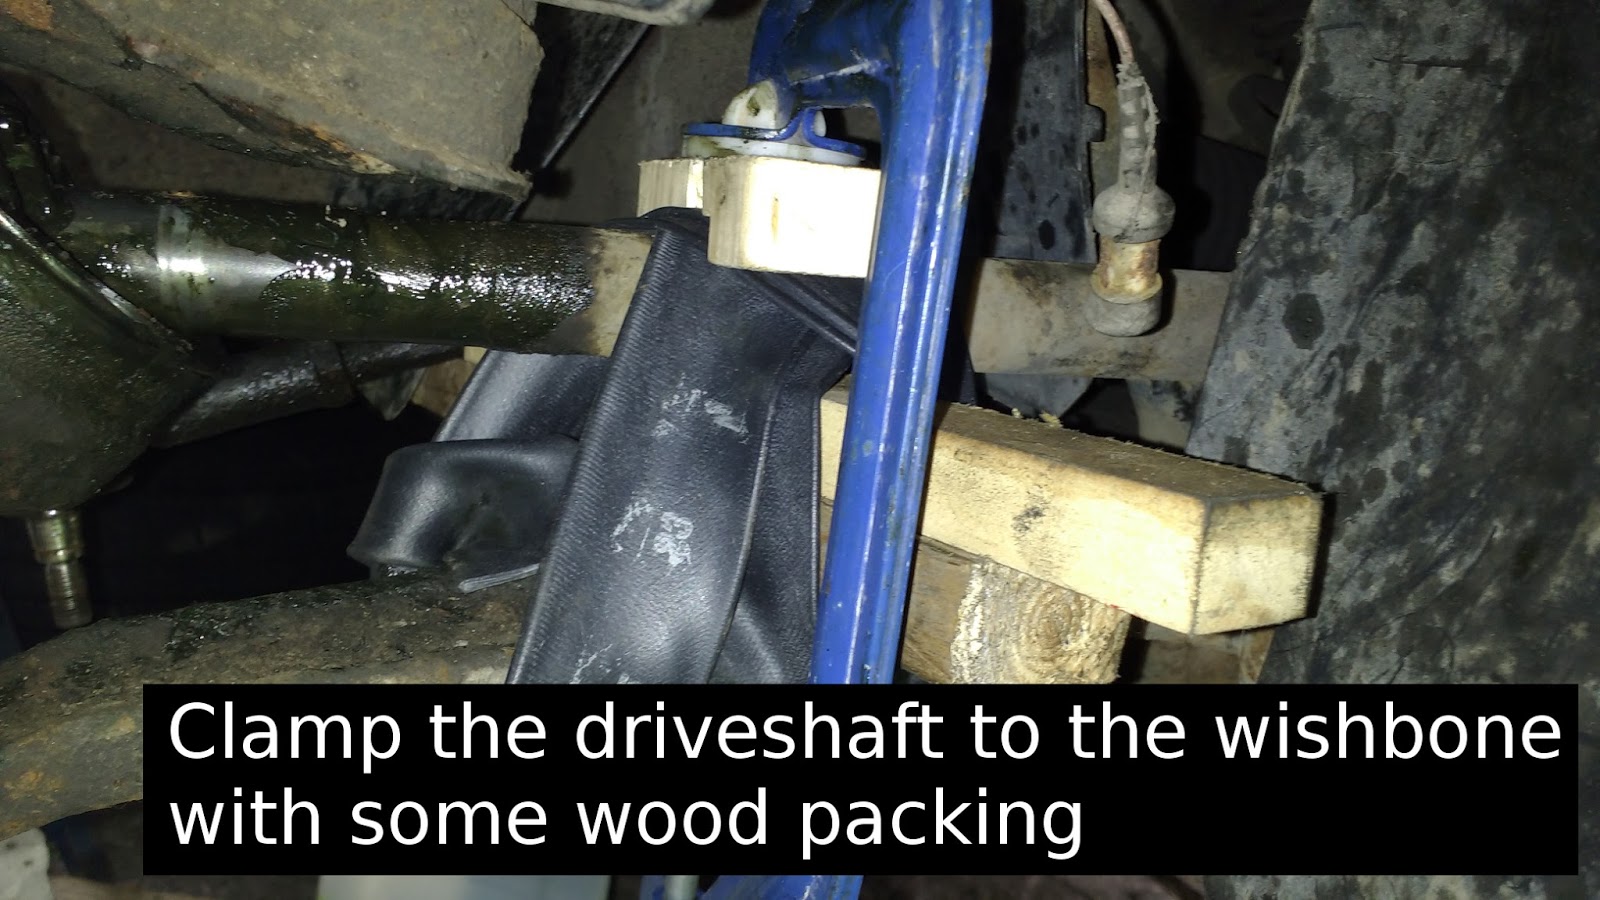
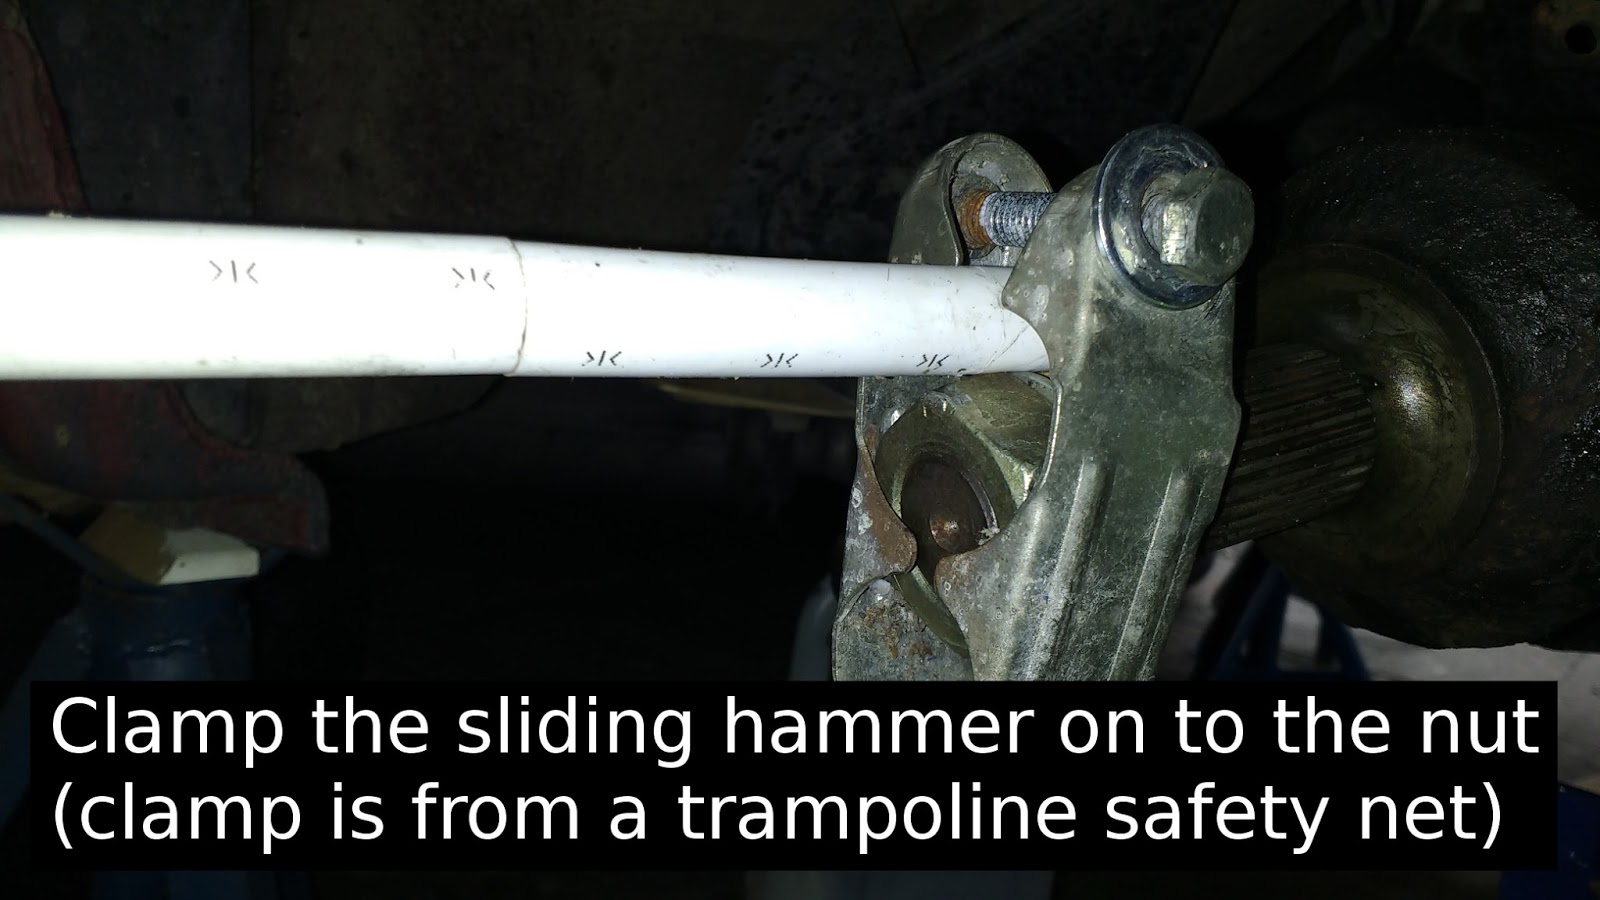
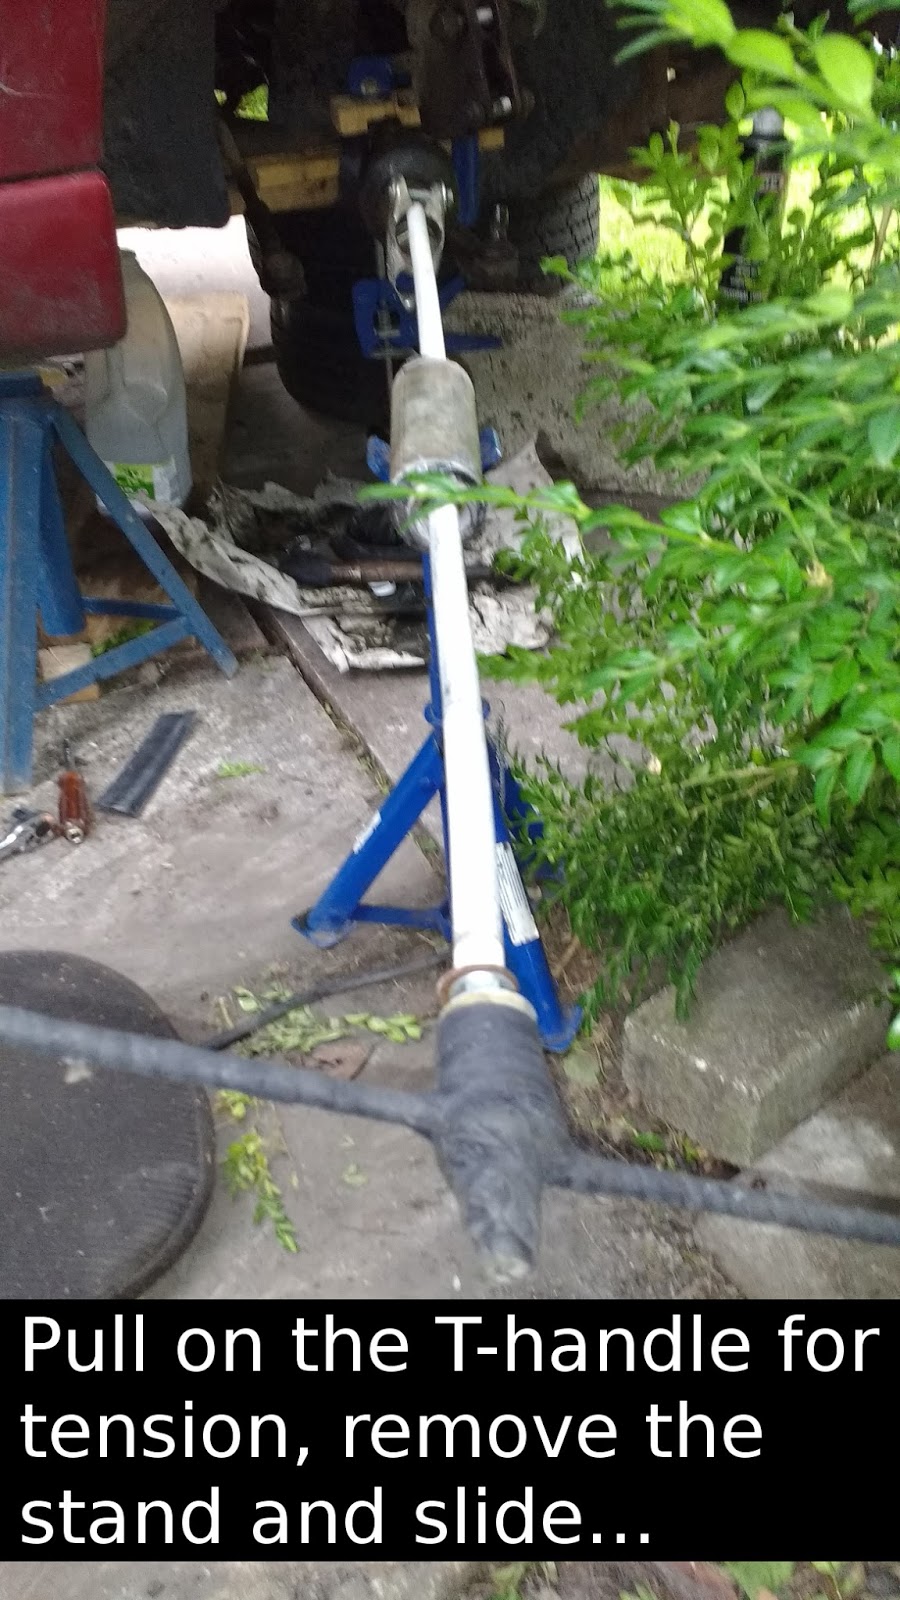
Now to remove the joint from the driveshaft. I firstly tried to ensure that attempting to pull the CV Joint off would not pull the driveshaft out.
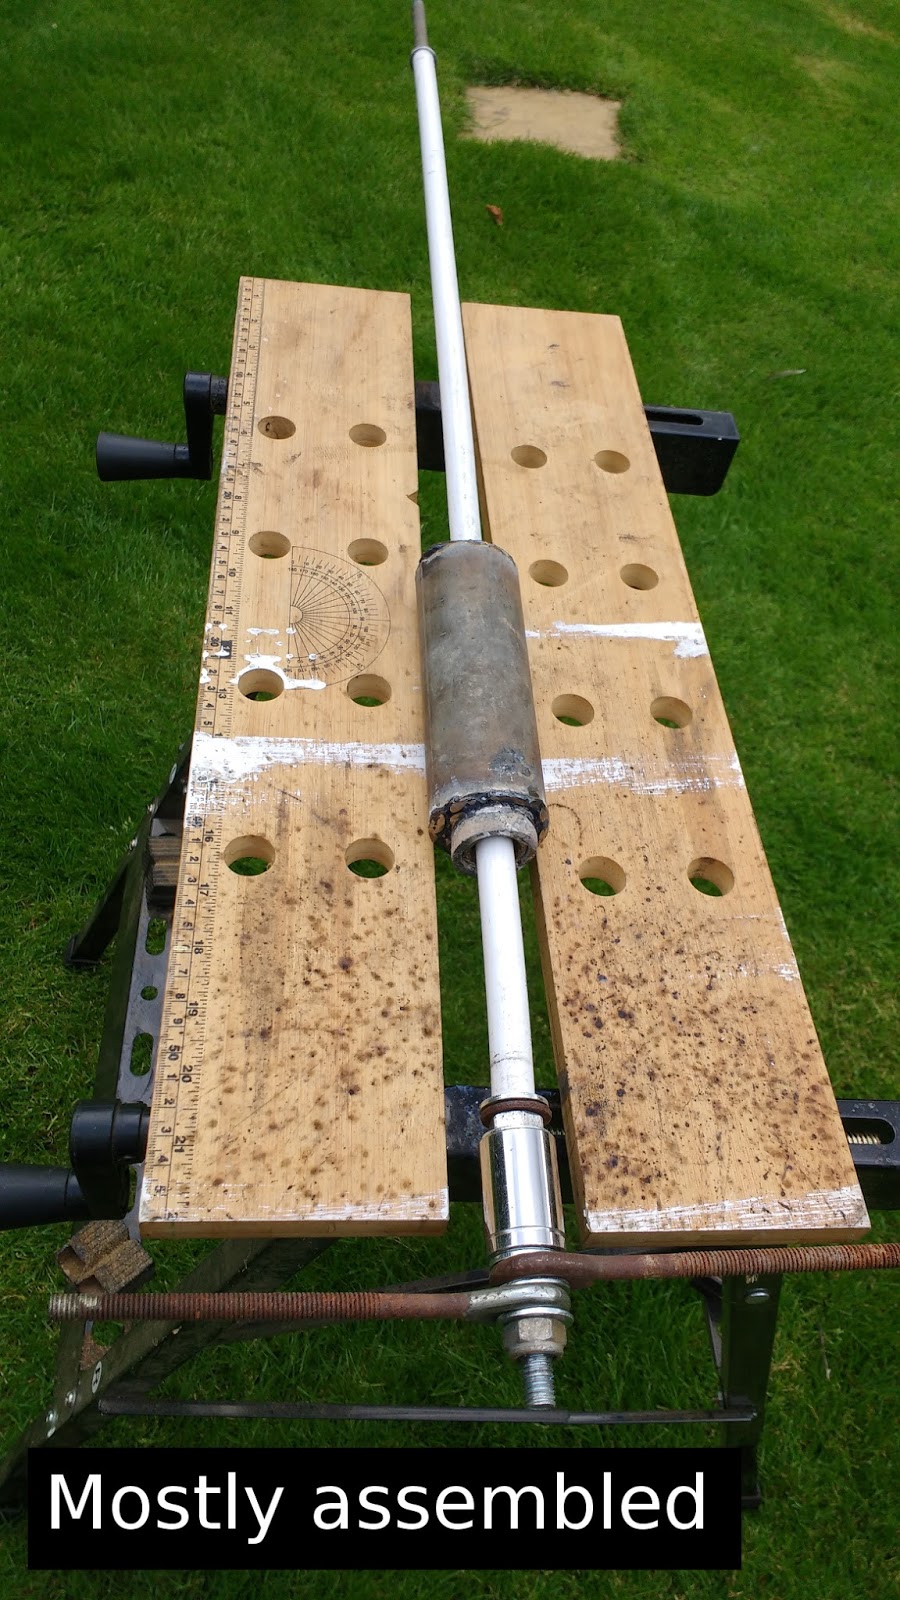
I saw some posts about using a slide hammer to shock the joint off the shaft. I didn't have a slide hammer so I made one out of a bit of threaded stud, some scaffold pipe, and various other bits and bobs I had lying around - I have a set of photos for that, here's one:
WARNING! The joint is secure on to the drive shaft with a spring clip - try to make sure that this doesn't fly away. You may need to have a replacement to hand.
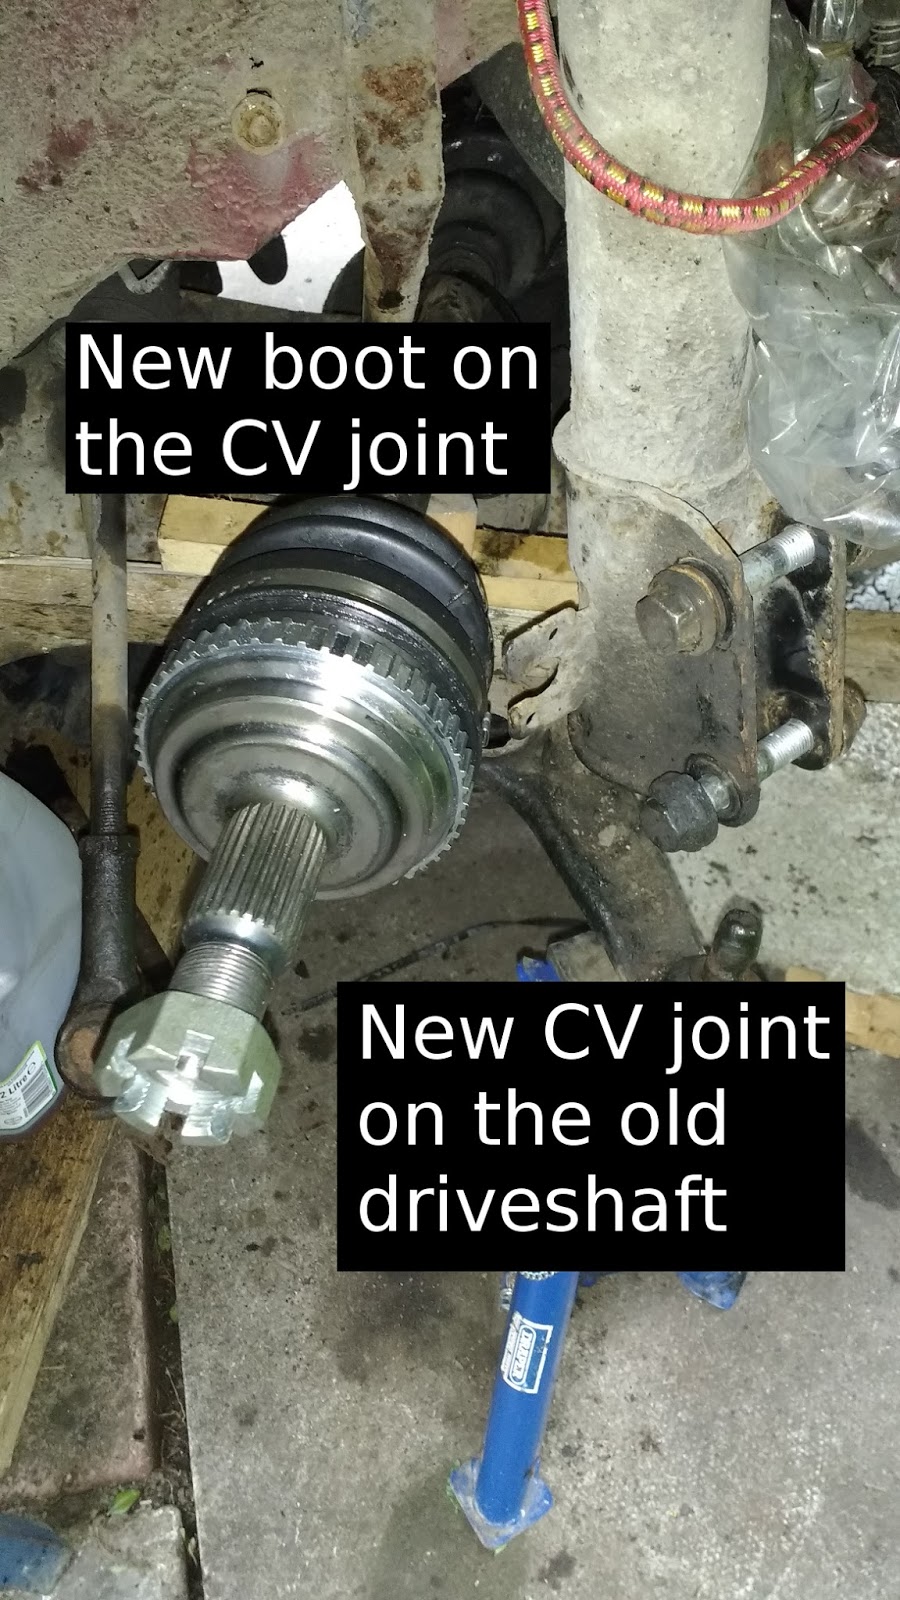
To fit the new joint, firstly clean up the drive shaft as much as possible. Then put the new boot on to the shaft (do not yet secure with the boot clips). Add the supplied grease to the new joint (this is where it gets messy again).
Getting the new joint over the spring clip on the driveshaft is awkward - I compressed the spring into its slot with a wide cable tie then offered the joint up on to the shaft up to the cable tie. I then used a rubber mallet to sharply move the joint over the clip, pushing the cable tie along. The cable tie was then cut off. This is analogous to using piston ring compressors in an engine block.
Push the joint home. Fit the boot over the joint and secure the boot clips.
In true Haynes style, reassembly is the opposite of what's been done - I need to get some more photos of this but I haven't finished in this wheel arch yet (track rod end, wishbone, brakepipe). Torque the hub nut up when the wheel is back on and the ground!
Offline
#2 2020-01-06 00:34:27
- Firemoth
- Member

- From: Bacup, Lancashire
- Registered: 2019-07-05
- Posts: 55
Re: 98 Scudo - Replacing a Wheel Side CV Joint - photos
Interesting write up that will come in handy. I've got CV joint to do (boot split, joint seems ok but given most of the work for the boot is involved for the joint itself, I tend to do the whole joint just in case). Was there a reason you needed to take that much off? I'd normally remove track rod and bottom ball joint, then there would be enough give to get the driveshaft out of the hub. But I've not done one on these so there could be something different going on that I don't know about?
If in doubt, give it a clout!
Offline
#3 2020-01-19 09:14:40
- cliffo
- Member
- Registered: 2017-08-04
- Posts: 128
Re: 98 Scudo - Replacing a Wheel Side CV Joint - photos
Interesting write up that will come in handy. I've got CV joint to do (boot split, joint seems ok but given most of the work for the boot is involved for the joint itself, I tend to do the whole joint just in case). Was there a reason you needed to take that much off? I'd normally remove track rod and bottom ball joint, then there would be enough give to get the driveshaft out of the hub. But I've not done one on these so there could be something different going on that I don't know about?
If you mean the lower wishbone, then that needed to come off because the ball joint rubber was split. When I bought the van it came with a load of spares including the wishbone
Offline
#4 2020-08-20 07:07:01
- Jumpy-Joe
- Member

- From: Norway
- Registered: 2020-08-17
- Posts: 58
Re: 98 Scudo - Replacing a Wheel Side CV Joint - photos
Good description, dude. I am far into the process of replacing both boots. I have a question, though: How do you drop the bottom ball joint without damaging the rubber? I am replacing the wishbone on the right side, but only the CV-boot on the left side.
Last edited by Jumpy-Joe (2020-08-20 07:59:08)
2003 Citroen Jumpy 1.9D
Famous last words: How Hard Can It Be
Offline
#5 2020-08-20 10:15:53
- woodbine
- Member

- From: Bristol, UK
- Registered: 2018-11-01
- Posts: 268
Re: 98 Scudo - Replacing a Wheel Side CV Joint - photos
Good description, dude. I am far into the process of replacing both boots. I have a question, though: How do you drop the bottom ball joint without damaging the rubber? I am replacing the wishbone on the right side, but only the CV-boot on the left side.
Jumpy Joe - If you watch this video from 3:15, he gives the area around the bottom bj a few good whacks with a large hammer to shock it loose, the prys it out with a long bar.
https://www.youtube.com/watch?v=uodcu5w_OUE&t=1014s
Last edited by woodbine (2020-08-20 10:16:07)
Fiat Scudo 2004 (54) 2.0 Jtd SX Dynamic Van
Offline
#6 2020-08-20 10:22:49
- woodbine
- Member
- From: Bristol, UK
- Registered: 2018-11-01
- Posts: 268
Re: 98 Scudo - Replacing a Wheel Side CV Joint - photos
Cliffo - Thanks for the full job description. Outer driveshaft boot split recently on my 2004 Scudo. Lucky I spotted it early when I was under there doing oil and filter change. Chickened out and got garage to renew boot. Seeing your description, good to know the mechanic earnt his money doing it.  Think I caught it in time, because no clonking or odd noises so joint still ok. I did change a front spring recently by myself, so I've still got it.
Started banging and clonking over bumps at the back now, poss arm bushes are on their way out. Looks easy to get the arms off, but getting old bushes out of arms seems a mare. May bottle it again and get garage to do. It's always something!!! 
Last edited by woodbine (2020-08-20 10:24:10)
Fiat Scudo 2004 (54) 2.0 Jtd SX Dynamic Van
Offline
#7 2020-08-20 14:13:19
- Jumpy-Joe
- Member
- From: Norway
- Registered: 2020-08-17
- Posts: 58
Re: 98 Scudo - Replacing a Wheel Side CV Joint - photos
Yeah. Beginning to think that it would have been better to have the shop handle this. Cannot for the life of me get the knuckle off the drive shaft. Talked to a mechanic I know, and he told me that these knuckles are not meant to be reused. Sometimes they have to destroy them to get them off. Not happy right now...
2003 Citroen Jumpy 1.9D
Famous last words: How Hard Can It Be
Offline
#8 2021-10-04 12:00:57
- NuttyProfessor
- Member

- Registered: 2021-10-04
- Posts: 1
Re: 98 Scudo - Replacing a Wheel Side CV Joint - photos
Hi. Replacing my driveshaft oil seal and offside driveshaft. What is the torque setting for the hub nut please?
thanks
Offline
#9 2021-10-04 15:21:51
- Pathfinder100
- Member

- From: South Yorkshire
- Registered: 2021-07-19
- Posts: 296
Re: 98 Scudo - Replacing a Wheel Side CV Joint - photos
A quick search got a single answer of 160Nm, which probably not the correct torque value, but worked for someone else. On my old Transit it was a rather insane 400Nm. Whatever you do, just make sure its tight. I used to do them up tight on my Fiesta but never actually used a torque wrench.
Maybe someone has the service manual.
[edit]
Possibly 325Nm.
https://www.fixya.com/cars/t27197786-pe … re_hub_but
Last edited by Pathfinder100 (2021-10-04 15:27:46)
2021 - 2025 Peugeot Expert 2006 2.0 Hdi 110 RHZ / DW10BTED+ 5 Speed Manual
Offline
#10 2021-10-04 23:35:47
- OAT
- Member

- From: Borders/Dales
- Registered: 2017-01-03
- Posts: 1,014
Re: 98 Scudo - Replacing a Wheel Side CV Joint - photos
Also suggested 320Nm here:-
Oct 10, 2013 - "The Haynes manual calls for 320 Nm"
https://www.peugeotforums.com/threads/f … lue.53490/
Sounds good, it shouldn't fall off anyway.
Which raises the question of what model the Haynes manual was for. I didn't think there was one for early models?
Offline
#11 2021-10-05 00:42:00
- Pathfinder100
- Member
- From: South Yorkshire
- Registered: 2021-07-19
- Posts: 296
Re: 98 Scudo - Replacing a Wheel Side CV Joint - photos
You can get a Haynes Manual for the MK2's and it's only logical (I guess) that they would keep the same torque settings across the models.
Unfortunately most torque wrenchs that go that high are far from cheap. Most are a minimum of £100. I have a digital that goes to 360Nm that I purchased some time back from machinemart (for £45), but down the line I would like an analogue version.
2021 - 2025 Peugeot Expert 2006 2.0 Hdi 110 RHZ / DW10BTED+ 5 Speed Manual
Offline
#12 2021-10-05 22:03:43

Re: 98 Scudo - Replacing a Wheel Side CV Joint - photos
Nice write up, AVOID JR driveshafts or when you order specifiy 27 splines (on my 04 1.9 non turbo anyway), don't need to a home made sliding tool to get the CV off end of shaft, since I was replacing CV I used a mallett lol.
Offline
#13 2021-10-09 14:33:32
- vaz2121
- Member

- From: Glasgow Living:~ SW. Scotland
- Registered: 2015-08-31
- Posts: 1,311
Re: 98 Scudo - Replacing a Wheel Side CV Joint - photos
I once did the crank bolt on a diesel Vectra after 3 failed attempts at cam belt changes on torquing .... it had been a taxi and abandoned so wasn't that high mieaged .... it was the 120 bhp Fiat derived engine ................
We ended up using the torque wrench for Lorry wheels to get a high enough setting .... I was Shi**** bricks that the bolt wouldn't hold ..........
we got 3 ex taxi diesel Vectas made 2 operational 1 ended up as a spares car and shipped out to easten europe with a knackered gearbox and was lowest milage off the 3 at 80,000 miles................
It coudn't have been a taxi long ... before disaster stuck .... Funny how you remember stuff ..................
Offline