The Dispatch | Expert | Scudo Hub
Get help & share your Citroen Dispatch (Jumpy) | Peugeot Expert | Fiat Scudo tips
You are not logged in.
- Topics: Active | Unanswered
#1 2020-08-29 17:47:04
- brman
- Member
- Registered: 2020-08-10
- Posts: 36
My scudo conversion
Now I have an engine that does not rattle (see https://dispatchexpertscudo.org.uk/foru … 277#p8277) I have decided to dive into converting my scudo to a mini camper. So I thought I would document what I am doing here. Plus probably ask all sorts of silly questions!
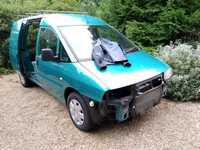
So, I am starting with my old works van, a 2.0JTD (110 turbo) and, according to a vin decode, the heavy load version. It was 3rd hand when I got it but supposedly only done 60k miles. That was 7 or 8 years ago and it has now only just managed to get over 70k miles with a massive 57 miles in the last 3 years!
I put a new battery in it and it fired up first turn of the key, not bad for 3 year old diesel. Then a clean with the pressure washer and put it in for an MOT. It failed, but only on tyres being perished. So, after 4 new tyres it had a new MOT,was taxed and insured and ready to go.
Well, not quite ready to go, after spending a few hours digging around I had an A4 list of things that needed fixing, starting with the crank pulley in the other thread.
Since then I have done the following:
1) The wheels were pretty rusty and the covers broken so while they were off to get the tyres done I painted them black and bought some cheap covers from amazon. It is amazing how much smarter they make the van look! I also had to recut the threads and replace two wheel bolts as they were a bit mangled.
2) removed the front bumper (it was hanging off on the left), and repaired all the mounting brackets and bolts that had either been broken or broke when I removed it.
While it was off I noticed the front crossmember was a bit crusty so I wire brushed it and gave it a coat of underseal. I also cleaned and waxed the the power steering pipes and fastened them down properly.
3) For the MOT I had to estimate the mileage for them as the odometer LCD had packed up. I did take it apart and clean up the flexi contacts but the flexit itself was too badly corroded so it needed replacing. I did think of doing this myself but it is heat bonded and that is a bit hit an miss without the correct tools so, despite being an electronic engineer, I decided to pay someone to do it.
Here I would like to give a quick plug to AKspeedo in Stirling (akspeedo.com). I shipped the speedo for arrival thursday and thursday 5.45pm I got a whatsapp message showing it working (he even fixed my clock....) and a promise to send it back friday. Sure enough, when I got up this morning (saturday) there was a parcel on my doorstep. I have to say I am very impressed with their service!
The only downside is that, now the LCD is working, I can see it desperately needs a service! 
In terms of general maintanence I still need to do a few things:
- possibly replace the door seals. They were leaking in any heavy rain although after another adjustment it stayed dry during some pretty torential rain. We shall see...
- clean up and paint the spare wheel carrier before it completely rusts away!
- sort out a stiff gear linkage. I am hoping it just needs a lube after sitting for so long
- change hte antifreeze, it looks more like rusty water....
- oil and filter
- new front pads (a bit low)
- clean out rear drums and work out why they are binding. Again, I am hoping just a bit of a clean and lube but I shall see.
- sort some rust. It is generally fairly good (famous last words...) but the towbar and body behind the rear bumper are pretty crusty. In fact I suspect some welding in the sections behind the rear wheels might be necessary at some point. But it is not urgent and I want to get on and use the van so.......
I have now moved on to turning it into a camper. First step is make something simple, just to prove to my wife we can sleep two (shall we say amply proportioned?) people in a van this small.
So, first step was empty the back and remove all ply lining, door cards etc. I then wired brushed all the rust spots and treated them with rust eater. 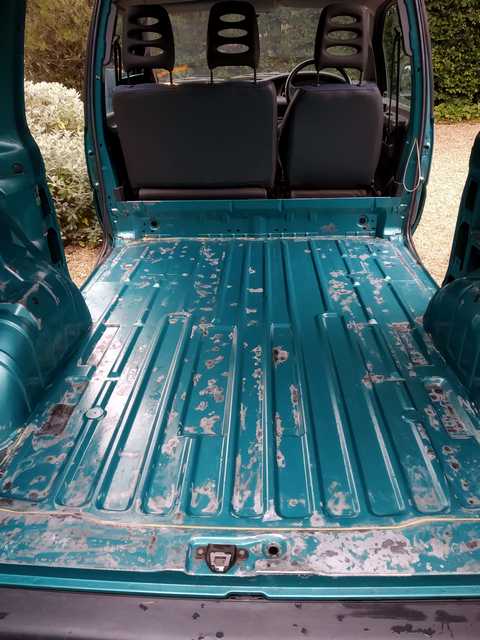
There were more little patches (basically most of the spot welds) that needed cleaning up but actually less real rust given the door seals have been leaking and there was often puddles just behind the mini bulkhead.
One thing I did noticed is what appears to be a design weakness. At the front corner of the rear wheel arches the seam between floor and arch appears to have to lip or weld, it is just the floor butting against the wheelarch with sealant filling the gap. The sealant here has dried out and cracked and I could actually see the road through the crack. So that needs resealing before I put a floor down.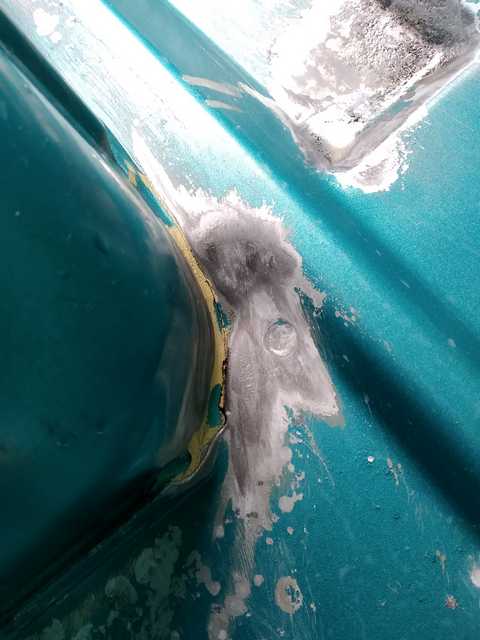
I have not properly investigated underneath yet (so please shout if you know better) but it does not look like there is any real rust there, just the cracked sealant. Easy enough to fix anyway.
So that is it so far. If anyone has any advice (other than don't do it! ) or comments then please dive in 
Last edited by brman (2020-08-29 18:30:10)
Offline
#2 2020-08-29 23:00:30
- OAT
- Member

- From: Borders/Dales
- Registered: 2017-01-03
- Posts: 1,013
Re: My scudo conversion
I look forward to following progress.
There are quite a few couples who, apparently, manage quite well in these small vans.
I am mostly solo these days though and find I have all the room I need. Could always fill more if I had it but the advantages of driving a small van make it worthwhile making do.
Pretty colour BTW. Marked contrast to the Mad Max front end.
Last edited by OAT (2020-08-29 23:04:12)
Offline
#3 2020-08-30 15:07:28
- brman
- Member
- Registered: 2020-08-10
- Posts: 36
Re: My scudo conversion
Yes, we are used to camping so hopefully the van will be a step up from that. The only thing I haven't figured out is what to do with the toilet. It would be nice not to have to rely on campsites facilities etc so I guess a toilet tent is probably preferable to a toilet in the van?
Not looking so mad max now 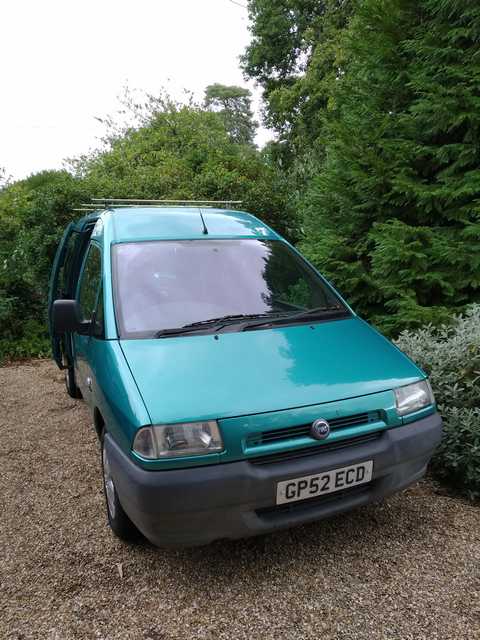
The bumper now fits properly for the first time in my ownership!
I have also zinc primered the cleaned up bits of the floor....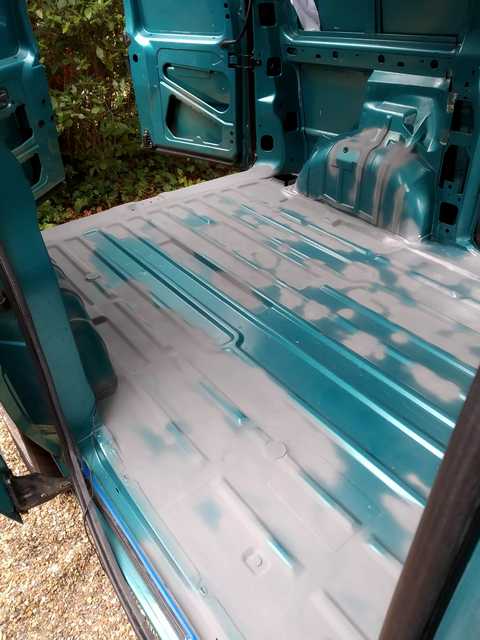
so the next step is a coat of paint then I can get on with insulating/laying the floor. That is going to have to wait a few days though.
Offline
#4 2020-08-31 12:33:10
- vaz2121
- Member

- From: Glasgow Living:~ SW. Scotland
- Registered: 2015-08-31
- Posts: 1,311
Re: My scudo conversion
Love the colour only thing is it'll be a bit** to match and like mine (Red) if you want a panel "it'll be white" Funnily Enough .............
As for being Ample ........... Snap We are too and yes it can get a bit tight..............
You get into a routine and it's so much easier than you first thought................

(You'll find it's 2metre floor space {length} 2.4 for LWB someone said}
The single Swivel seat makes such a difference.............
As for toilet...........
We don't have one...........
We did concider getting one for emergencey .................
But in the end we got one of those seat things that you put a bag in a bucket and tie it up afterward etc............. (But never needed to use it).............
We also invested in those hospital type P** bottles which we use quite a bit ........... they tend to get used emptied on grass in lay-bys etc........
Bleached,rinsed and put away in a carrier......... which all happens again when we get home and use boiling water with the domest** for steepping(soaking) rinsing and a new carrier bag ..........
We have in 5 years of van only used a camp site once and that was mostly for washing Machine and driers...........
which seem there popping up and getting dotted about a few petrol stations and other stop offs............ EG The Green Welly, @ Tyndrum has them.......
We tend use (Getting easier again) Suppermarket (Truck stop etc)facilities
Apart from I did many a year roaming about in a truck, We both did a reasonable amout of Motorcycle touring and Camping........ and Car Camping (sleeping in a 306 Peugeot on route to Spain) ...........
We decided on Van we things began to change for us a wee bit and what a revelation the van made..........
As I've said in past and Caspers named two of his vans "Tin Tent"..................
All the best with build...........
I'm sure you'll want to change things as soon as you use it (human nature) ..............
I'm looking farward to it's documented build Also ......
Most Important Enjoy It .... when it's all done
Offline
#5 2020-08-31 19:50:34
- brman
- Member
- Registered: 2020-08-10
- Posts: 36
Re: My scudo conversion
You are right, a nice colour but I would not want to paint it which is a shame as it does have a few scrapes that could do with sorting out.
Thanks for the pic and comments, a few questions if I may......
Interesting that you have the sink encroaching at the cab end. I assume you sleep head to the back and feet pushed together? (assuming two people)
Also, what width is your bed? This is an ongoing discussion with my wife. She quite likes our 5" double at home so thinks a 4'6" in the van would be good (pretty much full width between the pillars) but I am hoping for something smaller to make room for the sink/cooker etc.
I love the idea of a swivel seat but I currently have the 2+1 seating arrangement and cannot find any peugeot/citroen/fiat swivel seats. Not at sensible prices anyway. I guess I need to keep my eyes open or look at a seat from somewhere else that might do the job.
Our toilet is a kampa khazi which is basically a bag in the bucket. We shall see how we get on! I also plan to get a pee bottle but my wife is not so keen! I will have to see how that one goes... 
Thanks for the other info on toilet stops etc.
btw. I am hoping the 306 was an estate or it must have been a pretty cramped spanish trip!
Offline
#6 2020-08-31 19:55:20
- brman
- Member
- Registered: 2020-08-10
- Posts: 36
Re: My scudo conversion
Oh, and I had an idea that might get some comments (and/or ridicule! ).
What about changing the passenger seat to one that can be removed and folded. eg something like the back seats from a ford galaxy or similar. With appropriate mounting the seat could either be mounted facing backwards (ie an alternative to a rotating seat) or removed and stored under the bed.
If the latter, the space could then be curtained off and used as a toilet cubicle.
My wife thinks I am losing it. Is she right? 
Offline
#7 2020-09-01 09:30:15
- vaz2121
- Member
- From: Glasgow Living:~ SW. Scotland
- Registered: 2015-08-31
- Posts: 1,311
Re: My scudo conversion
yes we have our pillows at rear doors..........
bed width :~ That's a good question I did measure it once but don't really remember exactly (Guess it's out with tape measure again)
The van was built like that when new and obviuouly that layout when we got it ..........
Which I thought was really odd shape............. (But then our budget :~ Beggers can't be choosers etc)
But in use it makes sense having wider part for Torso......
It can make life interesting when turning over as sink area .....it sticks out just about Ar** height........
{Nothing dramatic but can make you tight to the hip if you sleep spread out}
We to have kingsize at home and the van is noticably Cosier........... We never get cold unless you feet are sticking out or your up at 3am for a cuppa on a winterish night............
I'm sure our swivel seat base was made in-house during build....... (I've always said a bit Heath Robertson but effective)
It consists of two metal plates with countersunk screws onto some heafty ply with a massive Bolt through center
The seats look to be out a pre-facelift WAV [I assume NOS at buildtime or speced and fitted by dealer when new] From what I can see Van started out life with a double passenger seat and seat belt buckle moved from seat to seat subframe.............
You'd probably have more grief finding a matching single seat or pair for van unless you got a pair of fronts out a car and modified them to subframe............
We don't use sleeping bags............ We have a memorey foam topper in a quilt cover but this time of year we swap between a summer quilt and a much heavier quilt either on top or underneath.........
Washing or changing quilt covers is much easier for us ..........
Most M/way Services and Truckstops will have showers available you just have to hunt them out and usually have to ask for key leaving a name or small deposit
If your ever in Orkney there's showers, washer Driers (coin op) in the ferry terminal, Stomness Also the larger fishing fleet harbours should have those types of facilities (Partner's father who now lives in Spain was a Fishing Trawler Skipper)
A trick I used........ Was to strap on truck cab roof usually behind Air Defector as large a plastic container with lid I could get my hands on fill about a 1/3rd with water, some Soap Powder {Low Foam} and some clothes obviously and as long as it was mostly {A-Roads not M/Way} National route with corners stop & start {get some sloshing} rather than Peage after a good few hours made for a half reasonable washing machine
BTW the 306 is a Diesel Hatchback but with rear seat down the bases removed and the front seats as far forward as poss you get abot 5foot 5 ish length.............
{foetal position pretty much for sleep and a Diagonal Stretch}
Offline
#8 2020-09-01 09:51:08
- vaz2121
- Member
- From: Glasgow Living:~ SW. Scotland
- Registered: 2015-08-31
- Posts: 1,311
Re: My scudo conversion
BTW:~ I've just noticed if your fitting a Swivel seat ----- seats you'll have to remove that bottom piece of bulkhead.......
It's not hard........... Ask Casper............
Insulate floor aswell..... it's well worth it
Offline
#9 2020-09-01 15:01:34
- vaz2121
- Member
- From: Glasgow Living:~ SW. Scotland
- Registered: 2015-08-31
- Posts: 1,311
Re: My scudo conversion
Quick update......
The widest part of bed just cushion space is 50 inches wide and probibly another couple with curvature of van.........
From the sink area to the sliding door piller is 40 1/2 inches and again a couple more where sliding door is...........
The bed is built on from what I see is a 20mm box section that just higher than wheel tubs sort of level with front seat bases so not more than 6 or 9 inch under bed (didn't measure) ..........
It's a sort of rock N roll design (Seat to bed)..........
The sink and twin burner combined is a Dometic branded thing is mounted into cabinet top 2 & 3 inch from edge to allow lid etc to lift that inturn is recesed into sliding door appature

Since photo I've installed a very much larger water container........
Also a thought from memory ........... Showers are best caught at Services before Tea Time as busy's up then and hot water's not so plentyful........
Offline
#10 2020-09-01 18:30:47
- brman
- Member
- Registered: 2020-08-10
- Posts: 36
Re: My scudo conversion
Thanks for all that, very helpful, especially the stuff about services, showers etc. I particularly like the idea for clothes washing although my wife wasn't so keep having all her smalls on display on the roof!
Thanks for the info on bed sizes, that gives me something to work from. I think my plan is to mock up a bed indoors and make it as narrow as possible, then see if my wife complains. I do have to be careful though as we both tend to toss and turn at night so I might want to compromise galley space for a slightly larger bed
Swivel seats do sound a good idea. In fact I was wondering whether I should remove the bulkhead just in case but decided against to start with. I do have a fairly good workshop (welder, lathe etc) so making up a swivel base would not be that difficult. The key I think would be to find seats that are comfortable, adjustable and not too large. That is something for the future though, for the moment I will stick with what I have.
I did make some progress today, the floor is now painted.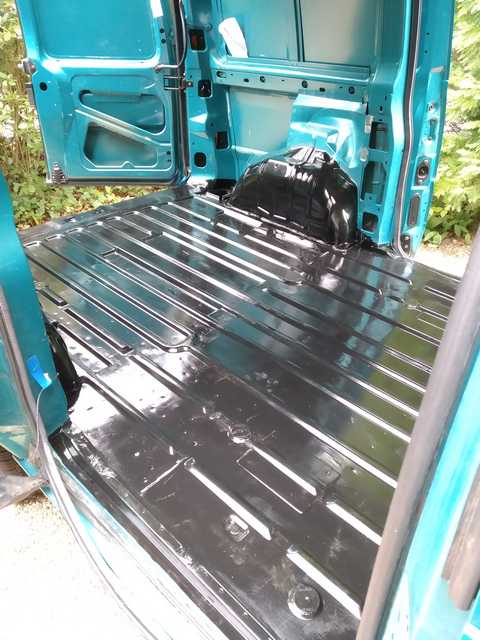
I went with hammerite metal paint brushed on and I think it was a mistake. Despite being thick and gloopy it still shows the brush marks badly, has gone matt where I brushed over it (eg to merge new paint with stuff painted 5 minutes previously) and generally looks like a 5 year old did it! I am really regretting not using spray cans, it would not have taken any longer and would have been a much better finish.
Still, not a big problem as about the only bit that will be visible when the floor is down is the mini bulkhead and rear door opening, I can always sand those back and redo them if they look too bad. Still annoying though!
Offline
#11 2020-09-02 00:04:37
- kenbw2
- Administrator

- From: Preston
- Registered: 2017-11-26
- Posts: 1,617
Re: My scudo conversion
I love what you're doing, the van looks great. I wouldn't worry about the paintwork, you'll have it covered anyway right?
For what it's worth, the mini bulkhead comes out quite easily. 2 bolts, a bit of sealer and a lump hammer will take care of the spot welds
2000 Citroen Dispatch 1.9TD XUD9 Camper Conversion
1999 Citroen Dispatch 1.9D DW8 Disassembled Camper Conversion
1996 Peugeot 806 1.9TD XUD9 Spare vehicle
1998 Citroen Synergie 1.9TD XUD9 Snapped timing belt
Offline
#12 2020-09-02 01:11:05
- OAT
- Member
- From: Borders/Dales
- Registered: 2017-01-03
- Posts: 1,013
Re: My scudo conversion
.I wouldn't worry about the paint at all. I recon you have done more good with bushed hammeriite than spraying.
You asked about toilet facilities above...
My own van was factory converted from new. It is about as small a conversion as posible to alow for 2 beds while still leaving room for a portapoty and more importantly, the space to use it. They only achieved this though by using the 4 seats as beds leaving clear space to the rear even when beds are down for kitchen & barroom "facilities".
I have never used it myself. I use it's cupboard for a gas bottle.
Bottle and bag for me. But as I said, I am usually solo. (Perhaps that's why? ☺)
Edit...
You might want to check the cab floor while you've got the paint out. They have a very thick and absorbant fibre type matting with a rubber skin. If water has ever gets in, it tends to stay. Could easily go unoticed until too late.
Last edited by OAT (2020-09-02 01:20:17)
Offline
#13 2020-09-02 07:47:52
- brman
- Member
- Registered: 2020-08-10
- Posts: 36
Re: My scudo conversion
I love what you're doing, the van looks great. I wouldn't worry about the paintwork, you'll have it covered anyway right?
For what it's worth, the mini bulkhead comes out quite easily. 2 bolts, a bit of sealer and a lump hammer will take care of the spot welds
Thanks, yes the paintwork does not really matter, only the bulkhead is going to show and I guess the solution to that is to remove it! I am leaving that for the moment though as I want basic load area sorted and usuable asap.
Offline
#14 2020-09-02 07:54:01
- brman
- Member
- Registered: 2020-08-10
- Posts: 36
Re: My scudo conversion
.I wouldn't worry about the paint at all. I recon you have done more good with bushed hammeriite than spraying.
You asked about toilet facilities above...
My own van was factory converted from new. It is about as small a conversion as posible to alow for 2 beds while still leaving room for a portapoty and more importantly, the space to use it. They only achieved this though by using the 4 seats as beds leaving clear space to the rear even when beds are down for kitchen & barroom "facilities".
I have never used it myself. I use it's cupboard for a gas bottle.
Bottle and bag for me. But as I said, I am usually solo. (Perhaps that's why? ☺)
Edit...
You might want to check the cab floor while you've got the paint out. They have a very thick and absorbant fibre type matting with a rubber skin. If water has ever gets in, it tends to stay. Could easily go unoticed until too late.
I think the plan at the moment is to have the toilet under a bunk and it can be brought out for use in a toilet tent if necessary. Or, in an emergency, in the rear when it is in seating arrangement.
A good point about the cab floor. I am concerned about that as water has definitely got it over the years (the passenger seat frame is rusty). Again though, I am burying my head in the sand and ignoring that for a few months. Once we have proved we want to continue with using the van as a camper I will sort that, maybe even fit a swivel seat (or two) and also sort the rust at the rear underside. That is phase 2 though
Offline
#15 2020-09-02 08:53:08
- Casper
- Member

- From: East Lothian
- Registered: 2015-12-20
- Posts: 2,180
Re: My scudo conversion
If its just a W/E van i would say keep it simple. Use an external awning if for sitting in and cooking. Keep van for bed and some storage as well as roof box. R&R bed with swivel seats make sitting in the van more pleasurable/less cramp. Mine was a cheap throw together but you get the idea of space. This did us for almost two weeks in Germany and the lass i sold it to did France as well as a few Ireland and tour Scotland trips.
https://mytintent.blogspot.com/p/blog-page.html
Last edited by Casper (2020-09-02 12:34:24)
Offline
#16 2020-09-02 11:14:54
- brman
- Member
- Registered: 2020-08-10
- Posts: 36
Re: My scudo conversion
thanks, yes I have already found your blog and have been using it for ideas 
Offline
#17 2020-09-02 18:28:05
- brman
- Member
- Registered: 2020-08-10
- Posts: 36
Re: My scudo conversion
Today was interrupted by work and having to fix my car (aux belt tensioner failed yesterday...) but some progress - sound deadening is going in.....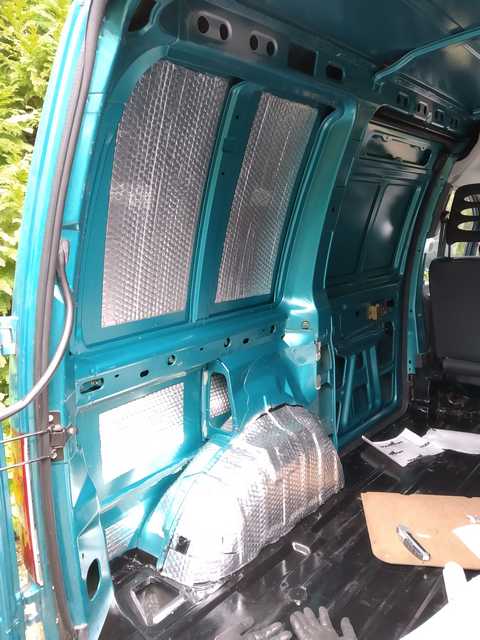
Side doors, floor and ceiling still to go then I can start on the floor and insulation.
Offline
#18 2020-09-03 13:58:39
- vaz2121
- Member
- From: Glasgow Living:~ SW. Scotland
- Registered: 2015-08-31
- Posts: 1,311
Re: My scudo conversion
I've noticed on some builds are having a stab a cutting cost and used old kitchen cabinets the ones srewed onto wall (as they work out about 12" deep)
Our sink/cooker unit size wise has been dictated by the Dometic sink cooker ..............
I believe you can now get slimmer units but longer..............
It's like everything a Compromise
Offline
#19 2020-09-03 17:55:07
- brman
- Member
- Registered: 2020-08-10
- Posts: 36
Re: My scudo conversion
I don't think I will be use kitchen units. They are heavy and are very unlikely to fit the space as I want. So I think I will be making my own. (famous last words...)
Offline
#20 2020-09-05 16:41:48
- brman
- Member
- Registered: 2020-08-10
- Posts: 36
Re: My scudo conversion
Well, I said the hammerite was a mistake and it was! Even after 4 days it stank so bad I got a headache working in the van. I did think of just leaving it and hoping but decided I was likely to regret that (I do have a very sensitive sense of smell.) so......
Masked it up and sprayed on a coat of Zinsser B-I-N Primer/Sealer & Stain Killer. This is supposed to suppress odours and it appears to work. 20 minutes after applying my wife came to see what I was doing and commented she could not longer smell the paint.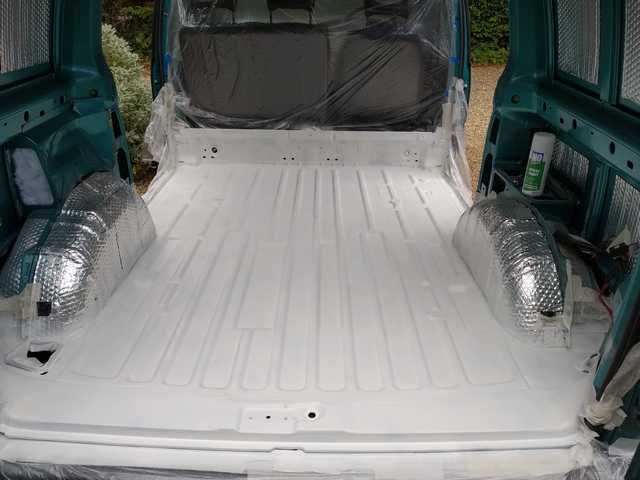
This gives a slightly rough and powdery finish so a couple of coats of black spray paint on the bits that might be exposed after the floor goes down....
Obviously the black topcoat smells but I am confident that will go quickly as it is just normal paint. So hopefully I can actually make some progress (ply the floor) tomorrow!
Oh, and I reckon that spray priming the rusty bits then spraying a top coat as I have done here would have taken half the time and no more money than brush painting the hammerite on. Lesson learnt....... 
Offline
#21 2020-09-06 20:45:06
- brman
- Member
- Registered: 2020-08-10
- Posts: 36
Re: My scudo conversion
Today's installment
Floor has sound deadening and insulation between the ribs (only, to keep height loss down). I have to admit I thought this would only take an hour or so but took more like 3 hours with my wife helping. To be honest I have no clue where the time went! 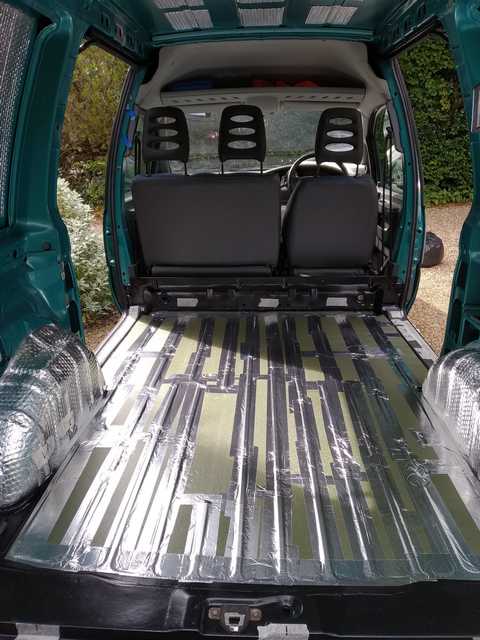
You might notice I have also marked some strategic ribs that the floor will be screwed down to.
I have also cut a foam/foil sheet to shape that will go below the ply floor. It will also be used as a template to cut the floor to shape.
Oh, and the van got used to get some sheets of ply for the floor etc.
Offline
#22 2020-09-09 18:43:36
- brman
- Member
- Registered: 2020-08-10
- Posts: 36
Re: My scudo conversion
Today's installment - cutting the ply floor (mostly).
I thought about a hour to trace the floor pattern to the ply and cut it out with a jigsaw but no, more like 2.5 hours of blood(*) sweat and tears!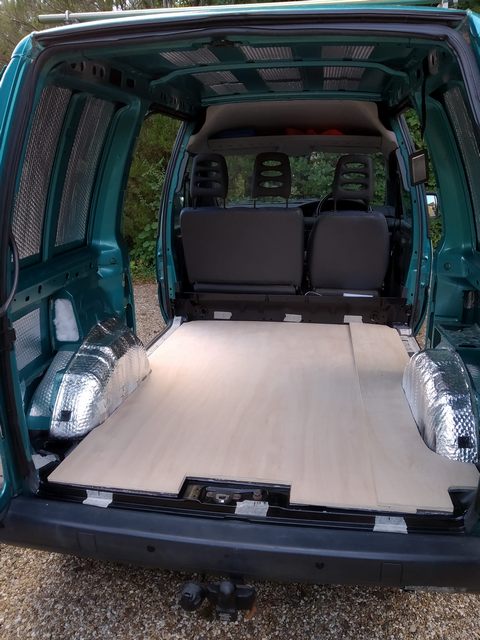
Sorry about the wonky picture, I had a very sore thumb(*) when I took it so was not paying much attention!
It still needs the join between the sheets marking and rebating for a half lap joint. Then screwed down.
(*) the sore thumb was the blood (and almost tears) bit. While I was doing the floor I decided to make a circular saw guide rail and, while screwing two bits of ply together, managed to put the impact driver bit through the side of my thumb. It hurt and bled quite a bit which was a bit incovenient given I had to finish screwing the rail together before some glue set 
Offline
#23 2020-09-13 16:23:17
- brman
- Member
- Registered: 2020-08-10
- Posts: 36
Re: My scudo conversion
Another update....
I finally got the floor joined (rebated and glued lap joint) and bolted down.
To be honest,if I was to do it again I would not do it this way! I decided I wanted maximum insulation in the grooves in the floor and did not want to lose height by putting battens in. So I decided I wanted a one piece floor (as there was not really anywhere to screw down the edges of the ply on a join), hence the glued half lap joint down the length. I also decided I wanted to use closed end rivnuts through the floor so I could seal them from underneath (ie no chance of rust).
All good aims but in reality:
- trying to get a good fitting full floor in is a pain. Even more of a pain when you need to remove it half a dozen times to get the fit and other things sorted.
- Rivnuts are great but in reality the floor is pretty thin so I am not convinced putting M6 bolts though it is really necessary.
- Despite drilling direct through the ply into the van floor (so you would think everything would line up well) the rivnuts needed a lot of tweeking to get the bolts in properly
So, 3 days to fit the floor was a bit much. If I did it again I would sikaflex thin battens in the grooves in the floor (it will take 12mm without raising the floor) a thin layer of insulation over the top and screw down the floor in lots of places to the battens. That could be arranged so the joint could be screwed flat rather than lapped/glued, there would be no bolts/rivnuts bridging the insulation and it would be way quicker and easier. (and probably as strong if not stronger)
Another learning point
Still, I now have battens on the ceiling which I can screw the ceiling to. 18mm thick which is basically the thickness of the ridges round the edge and the reinforcing member across the middle.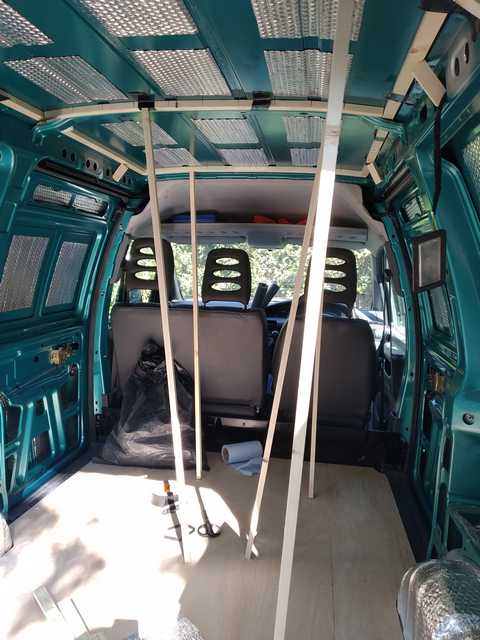
Offline
#24 2020-09-19 15:45:50
- brman
- Member
- Registered: 2020-08-10
- Posts: 36
Re: My scudo conversion
Not so my progress the last week. My boss suggested I should actually do some work
Still, I have now insulated (dodo fleece and a layer of foil/bubbwrap) and ply'ed the ceiling.
The ply took a good few hours although about 30 minutes of that was arguing with my wife how to do a template! I think I won the arguement in the end
She also tells me I am being way to fussy with the fit and we could have done it in half the time. She might have a point but I like the results......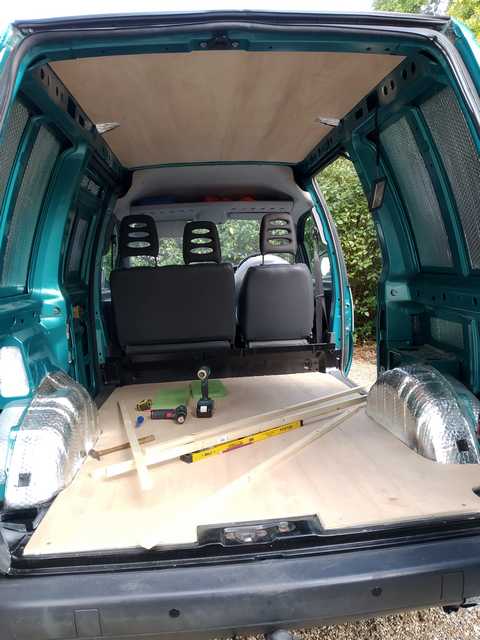
Oh, and halfway through doing the ply my neighbour told me that my wife said we are going away in it next weekend. Which was good, as I really needed a good laugh at that point
Offline
#25 2020-09-21 12:11:20
- vaz2121
- Member
- From: Glasgow Living:~ SW. Scotland
- Registered: 2015-08-31
- Posts: 1,311
Re: My scudo conversion
Excelent.........
The results are that In my eyes unless your roughing it you need to be fussy ......Otherwise as is said so often "It's the detail that counts".............
Also like many of us reality in comparison to what's in our minds eye is something else entirely..........
That doesn't mean you can't envisage or espire to
Like most things in life it's a learning curve..........
As a young skint pennyless person I was reading a workshop manual {Think for a brittish bike} as I had to rebuild engine and was looking for assistance........
I came to the section it said " With a little practice you'll get the knack and it'll all fall into place " or words to that effect........
After the swearing and the amount of time it took to get it assembled and it running like a bag of bolts {SH**E in other words} I came to the conclusion........
That the little practice and gleaned knack took 40 years on the Production line to attain
Offline