The Dispatch | Expert | Scudo Hub
Get help & share your Citroen Dispatch (Jumpy) | Peugeot Expert | Fiat Scudo tips
You are not logged in.
- Topics: Active | Unanswered
#1 Re: Maintenance » Re mk1 Dispatch gear knob. » 2026-02-04 23:45:58
A late arrival from Mr Cheapskate here! I too have had to try to extend the life of a cracked gear knob using copious amounts of superglue…..and then duct tape after the MOT guy’s handiwork in November.
At the time I went online to search for a replacement but the best I could find was on ebay at £68!!! …..how much!!!!
Then recently I had another look and yes, I did find listings on ebay for less at around the £45 mark but as far as I was concerned, that was still a total rip off for what is essentially a hollow piece of plastic.
Then this turned up on aliexpress.
Now I’m not keen on supporting the Chinese economy any more than I have to but I suspect that the oe units are probably made in China anyway and they just slap on a massive markup with the stuff on ebay and elsewhere. So I ordered one from aliexpress and it arrived a week later. Very good service too with tracking updates every day and the product seems just as good quality as the original. There is the difference that the top cap is textured rather than smooth like the original, but I expect I can probably refit the original anyway if it bothers me that much.
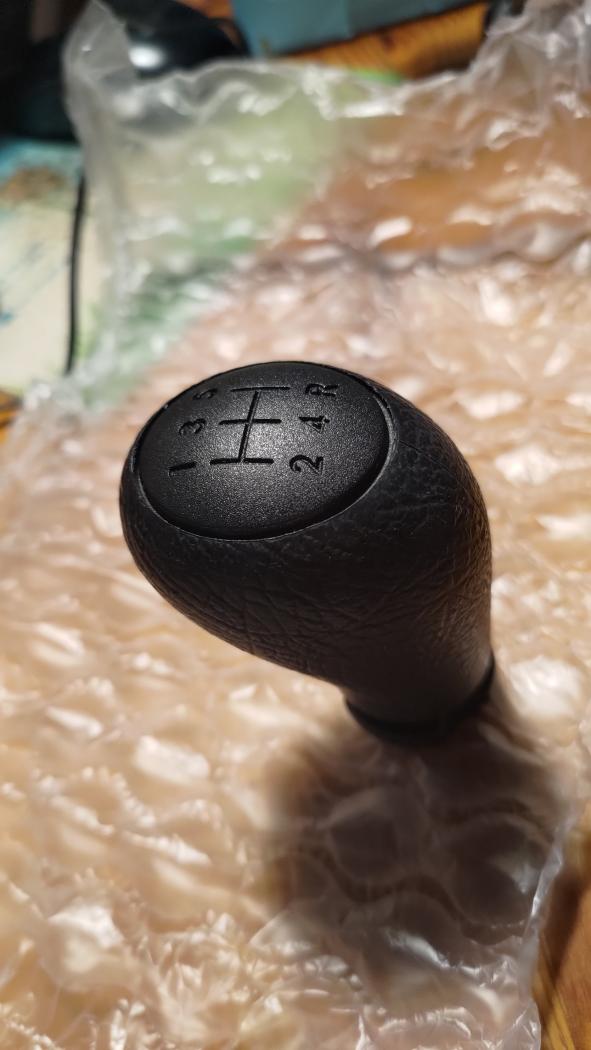
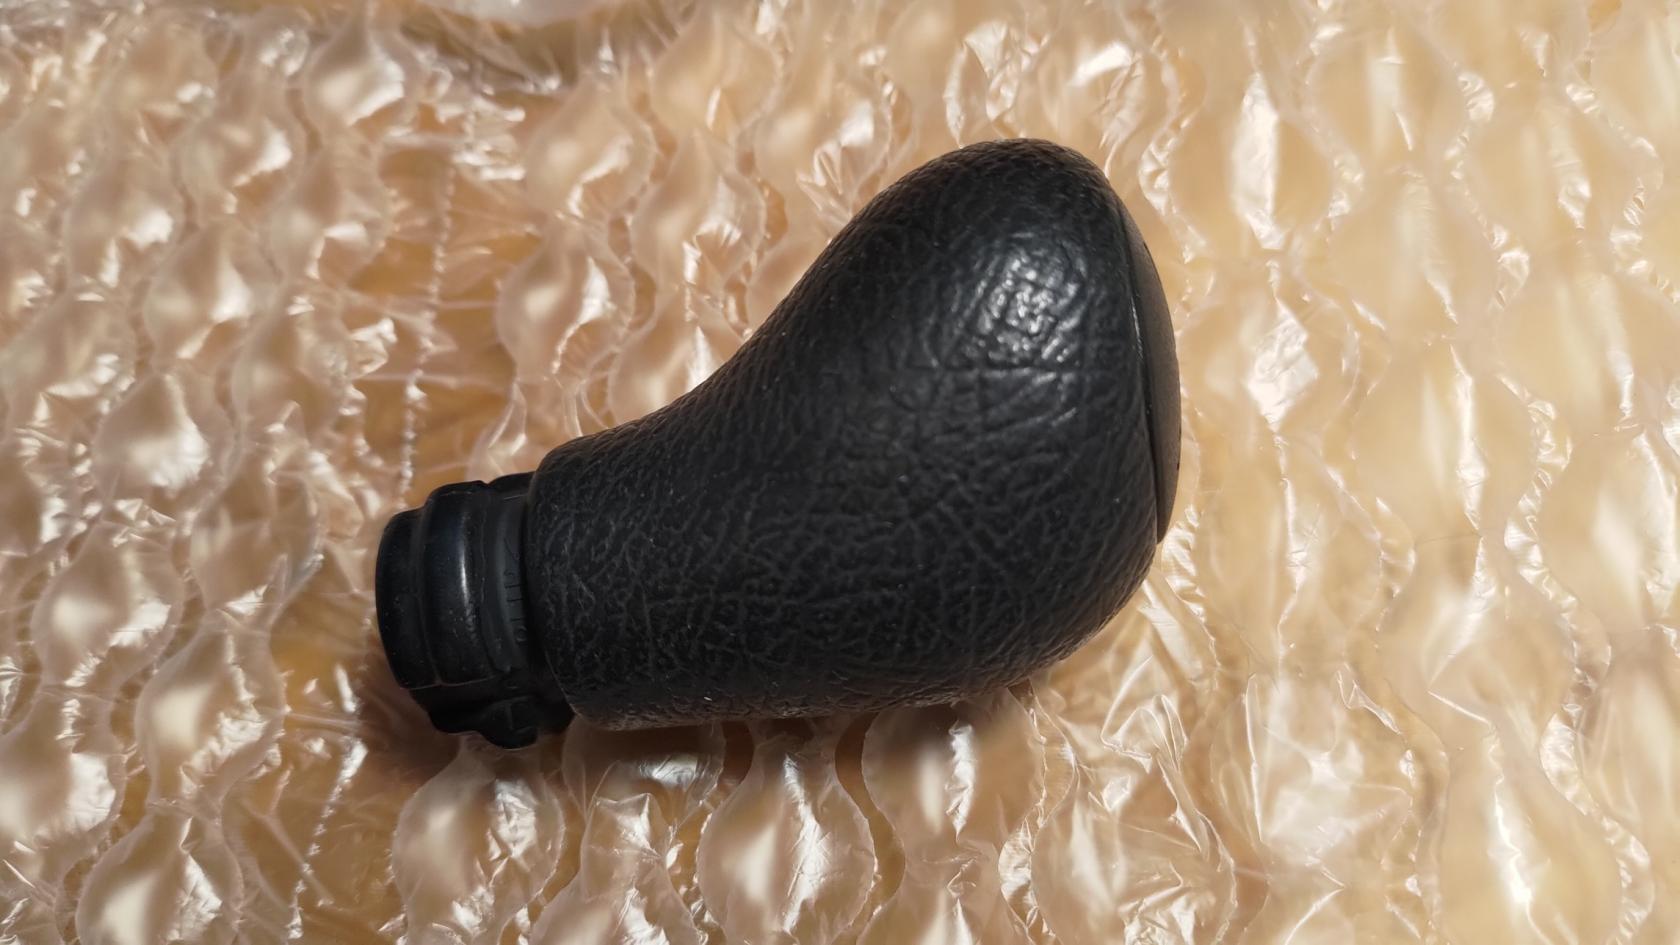
This is the type that fits on a spline like below, where you have to pull straight up to remove it.
I’ve concluded that pushing down or using a mallet on the top cap and outer shell to drive them home is not a good idea and is probably what caused my original to start cracking, so the best way to fit the new one is to remove the top cap and only apply force to the internal fitting where it goes over the spline.
Hope this helps others to save a few quid.
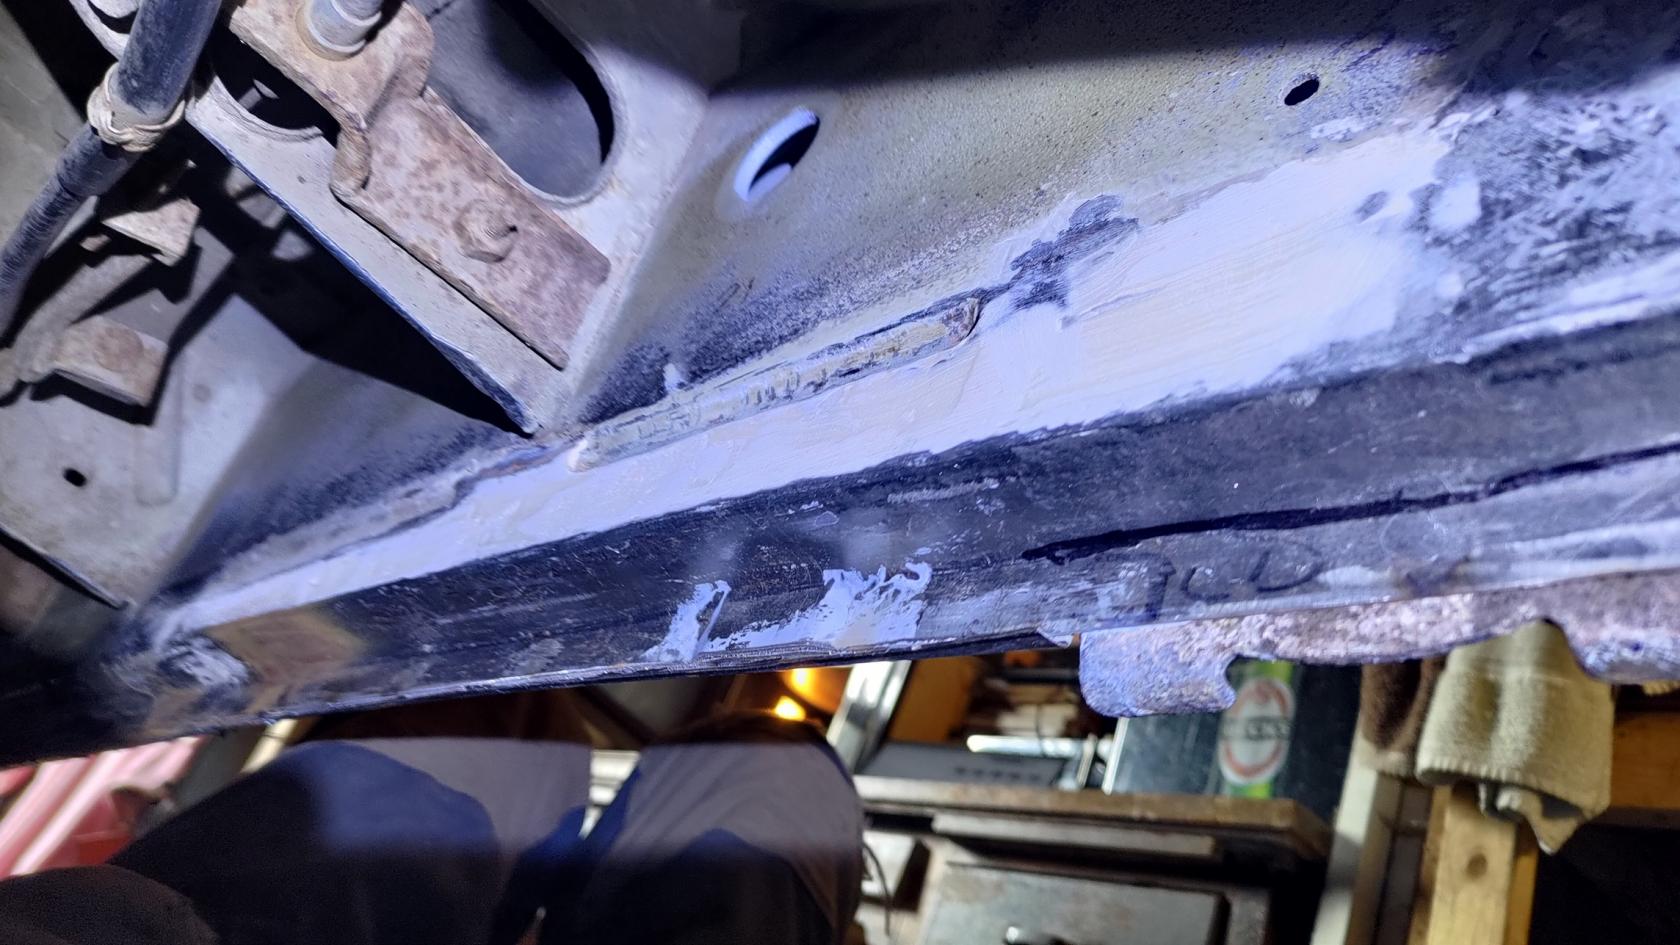
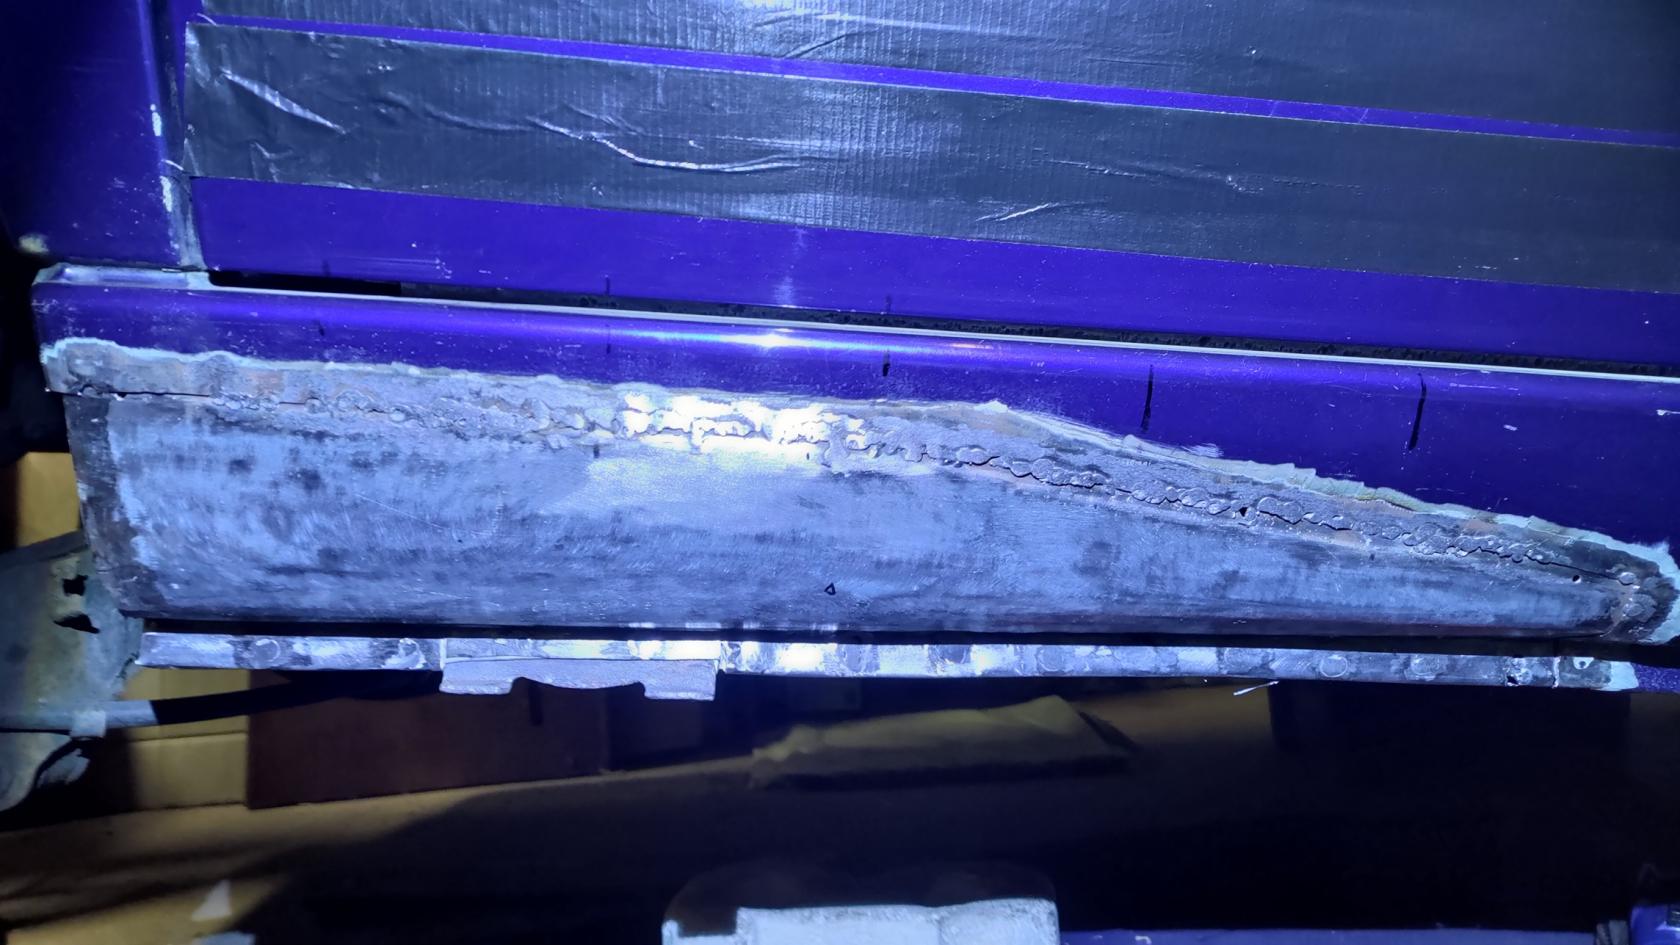
#2 Re: General Discussion » Welding a galvanised van - problematic? » 2026-01-25 13:48:55
Hi Folks,
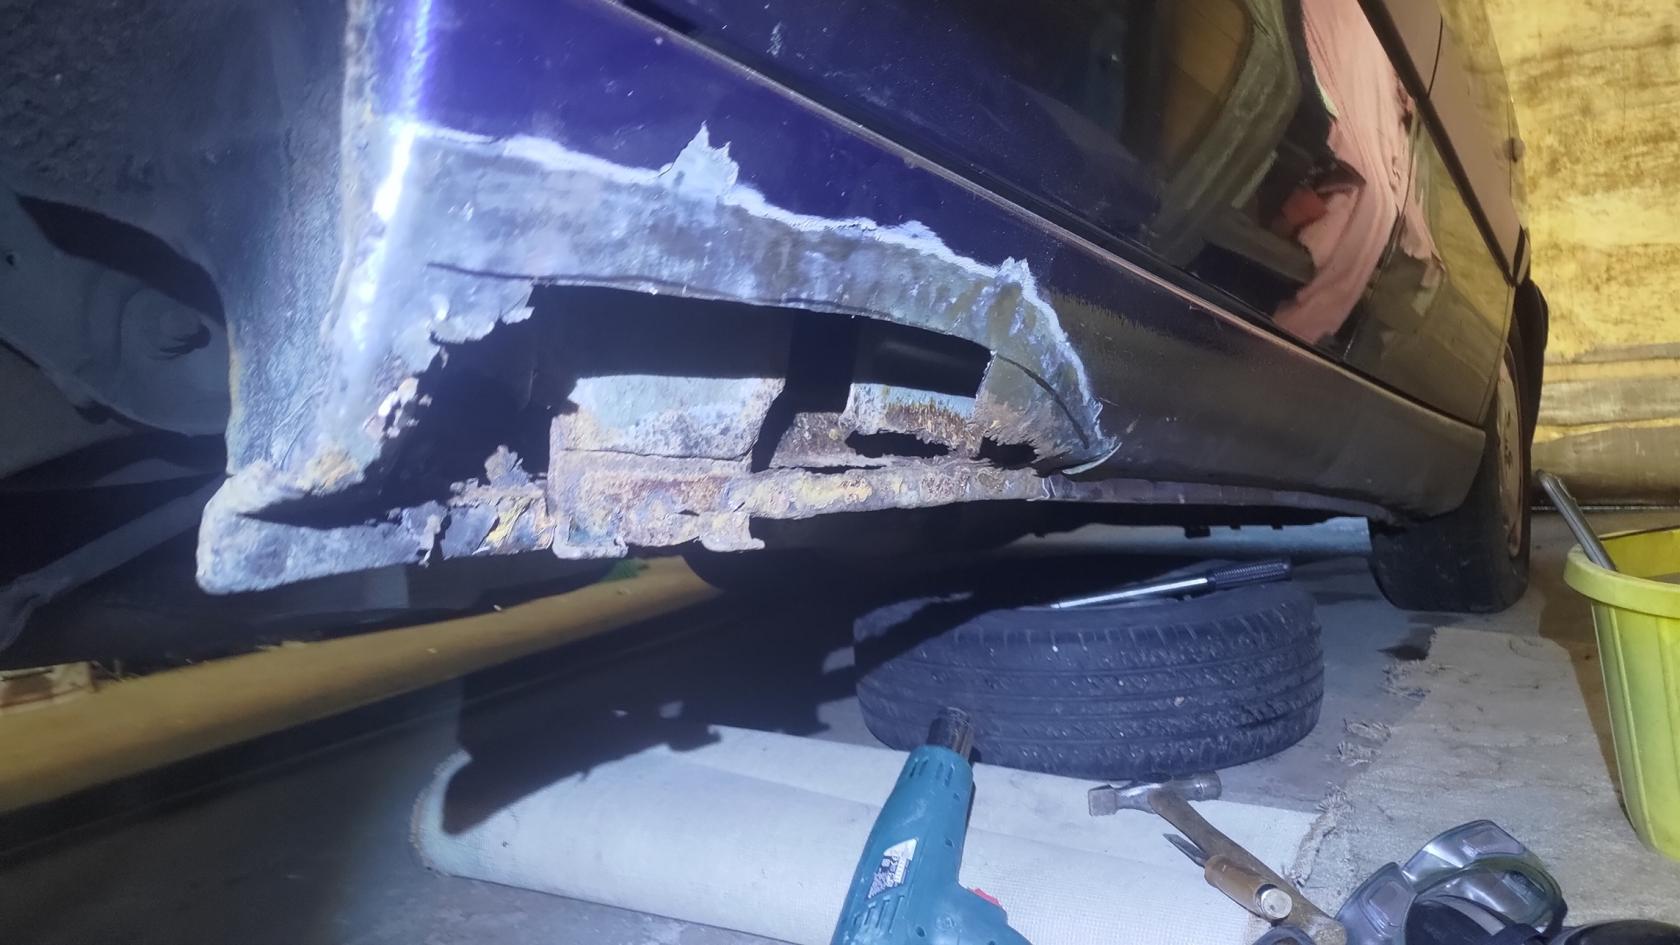
There's deffo some sort of galvanising or maybe aluminising on our Eileen's sills (2006 1.9 DW8B). It looks lighter and more silvery than the underlying steel. Trouble is it only seems to be on the outer surface which would explain why the panels rot so readily from the inside.
Whatever it is, the result is it's a bastard trying to weld new panels in. I spent 2 months last autumn repairing the off side rear sill and jacking point. Even after having cut out about a 2 foot length from the outer sill, some of the native metal was still paper thin at the forward end and after cleaning off the outer galv or whatever it is, it was like trying to weld tin foil, peppered with pin holes.
Good luck with getting Brenda sorted. Worth saving as like you say these vehicles are getting rarer and rarer.


#3 Re: Maintenance » Oil leak from DW8B cam cover » 2023-11-20 22:38:41
So on mine
Basically in Two halves so it's metal to metal from the main part to the head. So used sealant on that. It's only got 2x 6mm bolts holding it down. Probably why they leak so badly
Then on top is a plastic cover. Ordered a set of eBay which came with two. One fitted the other got filed in the bin. Rubber gasket jobbies
Hope that helps
Thanks for your advice Gastonnnnn! Yes would make sense why they leak so badly from the bottom joint with only 2 bolts. Maybe thats why they switched from a gasket to RTV. Will get back to dealing with this at some point but first priority is sorting out my brakes atm..... might come in handy!!!
#4 Re: Maintenance » Air Bag warning light intermittent » 2023-10-26 12:57:19
My 06 plate is central like OPs under the mat. I've heard they're great for gathering liquids but mine was pretty dry thankfully.
If you do get around to taking the seats out, I strongly recommend you look under the van for all of the exposed bolts and observe the rusted/rotten threads.
Unbolt them until you feel resistance then stop and screw them back down.
Take a dremel to the rotten ends of the bolts.
Some bolt ends will be hidden in the chassis but fortunately these are more shielded and came out in one piece for me.
Yeah I know what you mean about checking the seat bolt threads under the van. I wire brushed them and sprayed releasing oil on some weeks back and then screwed short pieces of rubber tubing over the threads to protect them. Have left that for now while I sort out other, more pressing, issues like the blower motors and now the front brakes (which were missed in the MOT!)  . Always something eh!
#5 Maintenance » Oil leak from DW8B cam cover » 2023-10-19 17:16:39
- Eileen2006
- Replies: 2
Hi Folks,
Me again, this time trying to sort out the long term oil leak from the cam cover which has been running down the back of the block. It can't be good for the rear engine mount having oil all over it. I do get issues with judder when pulling away, especially when the engine is warmed up, maybe because of a soft engine mount on account of being soaked in oil.
Anyway I've been trying to source a replacement cam cover gasket to fix the leak. It turns out there are two gaskets, or there were, up until around 1999 according to our local GSF. After that, they say Peugeot starting specifying RTV silicone for the lower gasket. Certainly judging by the pics below, the lower gasket looks like orange RTV, but my instincts are that a proper gasket would be better. What say you guys? Is a proper gasket even suitable for the later engines and can you still get them that easily? GSF only have one in the whole company.
TIA


#6 Re: Maintenance » Air Bag warning light intermittent » 2023-10-15 14:42:17
Mine is offset to the left, under the passenger seat but is a similar dimple to that
Interesting that your ECU sounds like its in a different place. I had a look under Eileen some weeks back and the housing in the floor pan for the ecu looked pretty central. Will have another look next time she's on axle stands.
Still wanting to refurb the blower motors as first priority atm once the new carbon brushes turn up, this week hopefully.
#7 Re: Maintenance » Air Bag warning light intermittent » 2023-10-14 12:40:39
Eileen2006 wrote:it's a darn sight easier to get at than the ecu under the rubber matting.
Doesn't your rubber mat have a flap in it to give access?
I'm assuming it's under the rubber mat between the two seats but no sign of a flap......

#8 Re: Maintenance » Air Bag warning light intermittent » 2023-10-12 15:46:31
Different van but my intermittent air bag light was the plug going into the ECU. Copper pins were growing green crud. Tin a spray brake and clutch cleaner and the wifes toothbrush fixed that issue. I also had it with a Pug 306. That turned out to be the air bag clock under the steering wheel was falling apart. Never noticed until it was to late and copper wire was springing out
Scrap yard cured that issue for little money
Thanks Casper. Yes I was wondering about investigating the air bag contact under the steering wheel as (I presume) it's a darn sight easier to get at than the ecu under the rubber matting. As it is I've parked the whole issue for a while as more pressing things to sort, like the blower motors. When I get back to the air bag light, i'm inclined to take to a local mechanic to see if he can pull any codes off the ecu.
#9 Maintenance » Gearbox 5th gear flange leak » 2023-09-29 14:10:35
- Eileen2006
- Replies: 0
Just been hunting around on here to see if anyone has mentioned how best to fix gearbox oil leaking from the 5th gear casing joint, but to no avail surprisingly.
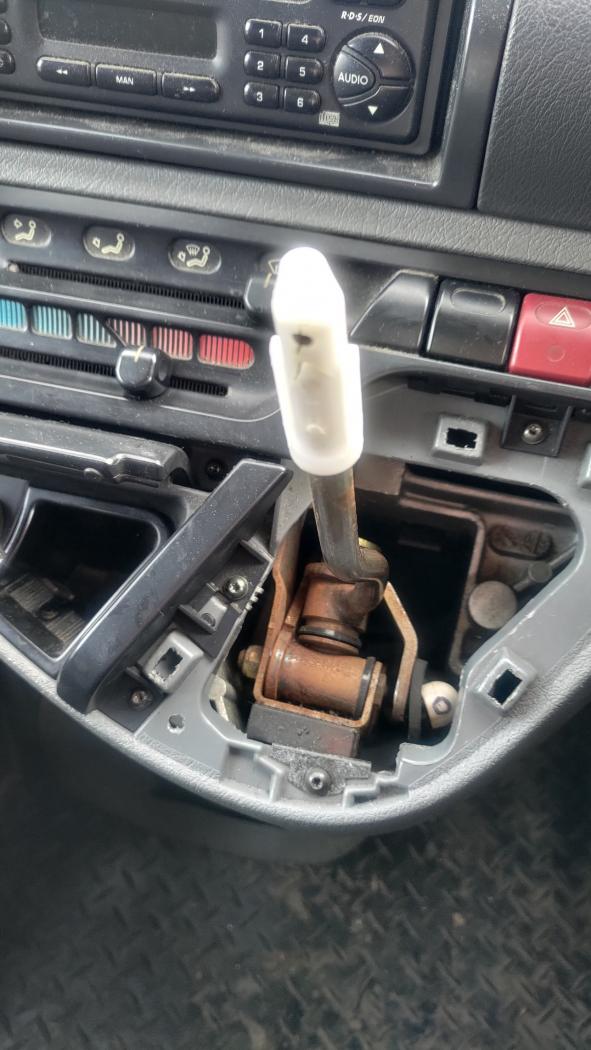
When I bought Eileen it was with the knowledge that there was a 5th gear issue - it kept jumping out of 5th so I was driving around for ages holding the gear knob to keep it in place. I checked the gearbox oil level and it was virtually empty - probably explained the 5th gear issue! Topping up the oil had no impact on the issue so eventually I sourced a very good condition refurbed box and fitted that.
Since then I've been very conscious about keeping the gearbox oil topped up and when I noticed oil leaking out of the joint between the main gearbox casing and the 5th gear cover plate, I dropped the oil, removed the cover plate, cleaned up, degreased and sealed the joint with blue hylomar. Thing is it's now weeping again so blue hylomar looks like it wasn't the best thing for the job. Service Box seems to indicate that early boxes used a gasket on this joint (arrowed in the pic) but only until RPO 08183. I'm assuming with the later vehicles, flange sealant was used instead?
Any advice as how to best seal this joint would be appreciated.

#10 Re: Maintenance » Air Bag warning light intermittent » 2023-09-29 13:13:14
Quick update on this one. My investigations into the location of the airbag ecu lead me to park that one for a while - plenty of other things on the van more urgent to deal with. I did establish the ecu's location under the rubber floor mat between the seats but being as the seats need to be removed, or at least one of them anyway, in order to roll back the floor mat for access to the ecu, I've left that for now. The fixing bolts for the seats are pretty seized and are way too thin for my liking and at risk of snapping. I don't really want to try heat on them due to the proximity of the rubber matting so have just applied some releasing oil to soak in.
I took the van to two different mechanics to try to do some diagnostics on the airbag system but or course, on both occassions the airbag warning light wasn't on at the time and they either couldn't get any fault codes or couldn't even connect their OBD diag devices to the airbag ecu. Thankfully the airbag light stayed off during the MOT so I got through that without any major issues.
#11 Re: Maintenance » Heater blower » 2023-09-25 22:28:26
@Eileen2006 How is it going, any updates?
A bit of an update. Currently looking to source replacement carbon brushes for the original blower motor. The old brushes have definitely had it as you can see. The commutator looks fine though. Awkwardly the ends of the copper braids are crimped as well as soldered in place to the circuit board so I've just cut through them to remove for now, leaving part of the braids in place. Might be easier to just solder the braids on the new brushes to what remains of the old braids rather than try to remove the remainder from the crimps.
I'm hoping the motor, once repaired, will serve as a spare for either the driver or passenger side units. Service box lists different part numbers for the LH and RH complete assemblies but I'm guessing the motor is identical and its just the plastic housing it sits in which is different.
In the meantime I've removed the vents below the wipers and investigated down in the bowels of the ventilation ducts, to make sure nothing is in there that could cause issues with the blower motors - as suspected full of crud so gave both sides a good vacuum out, unblocked the drains and flushed through. I never realised before seeing your link that those vents were removable so thanks again. Also told my brother who has a 2004 dispatch and he was much appreciative, not least because he's been having water collect in the passenger footwell and assumed it was his windscreen leaking.

#12 Re: Maintenance » Heater blower » 2023-09-20 18:57:47
Eileen2006 wrote:Scudiro wrote:Happened in my van too,.
Now the winter is looming though, I want to get both blowers back to working. Being as there was no issue with speed control on the old blower, I thought I’d just swap over the resistor from this one to the new blower in the van – bingo! we had variable speed back again so it was definitely the resistor at fault. Unfortunately the fix only lasted for a day, then the old resistor must have blown as well because the blower went back on full speed all the time…so I’ve had to pull the plug again. I’m wondering if there is now something up with the newer blower motor causing it to draw too much current maybe, and keep blowing resistors. So my next move is to refit the original blower after a refurb, with another resistor of course. Has anyone on here been successful at refurbing these motors? Mine deffo looks like it needs new brushes as well as the bearings sorting or just lubing. Does anyone know a good source for these brushes or even just what size they are?
Even replacing the blower motor (w resistor) doesn't necessarily mean it is solved (as happened in my case), down to the resistor going "funny" it typically melts anything it can before fuse would go... wiring, sliders, relays etc, etc
https://dispatchexpertscudo.org.uk/foru … hp?id=1645
https://dispatchexpertscudo.org.uk/foru … php?id=239
if you in to in detail things (not a repair, but modernisation topic (briddy good BTW))
https://dispatchexpertscudo.org.uk/foru … hp?id=1080
Thanks for making the point again that damage could have been caused to wiring etc when the resistor failed. I could be wrong of course but I don't think there's any issue with the loom etc having got overheated here because there is no sign of overheating on the blown resistor terminals, certainly not the one in the pic below that I've already removed. I've seen another post on here where there definitely were signs of overheating around the spade terminals. Also if there was a problem with the slider, I would expect the driver's side blower to be affected too which it isn't, its just got squealy bearings. Of course there could still be an issue with the loom supplying the passenger side blower I guess. I'll have to do some checks when I remove the motor next time.

#13 Re: Maintenance » Heater blower » 2023-09-20 15:02:52
That's great. Thanks for the link fella!
#14 Re: Maintenance » Heater blower » 2023-09-19 22:50:39
Happened in my van too, the resistor was the problem. At first the fan stopped working, then suddenly it came on full speed and stayed full speed regardless of the position of the slider. The only way to stop it was to pull the plug at the bottom of the fan unit. Not visible on the photo behind the glove box. You have to stick your head upside down in the passenger footwell and look up behind the glovebox. On the positive side, the plug is easier to reach than the 3 torx screws that hold the assembly in.
I'm lucky to have a donor van. Took the fan from that, held it under the glovebox so that I could push the loose hanging plug into it, and it worked, responded to the slider as it should. So the slider, fuses, relays, wires, plugs and whatever else were fine. The problem had to be in the fan unit itself, and as it was going full speed when plugged in, the brushes clearly were good and the only explanation was a faulty resistor.
Removed the fan with the bad resistor and replaced with the fan assembly from the donor van. All fine since then, fingers crossed.
As others have remarked here, even when the 3 srews are removed the fan unit doesn't come out easy, you may have to get some wires and/or brackets out of the way.
This blower motor business must be catching lol as mine has been playing up again too, specifically the one behind the glove box. I say the 'one' because Eileen has aircon and therefore 2 blower motors, the other being on the driver's side...... I wonder how easy that is to get at
Anyway my glove box side blower has done exactly the same as yours did Scudiro, on full speed all the time and not responding to the slider position so I did the same as you and pulled out the brown power supply plug. The full story is that a good couple of years ago the passenger side blower started getting very squealy and sounded like it needed to be replaced. I tracked down a complete new old stock unit and installed that. There was no issue with speed control with the old blower, it was just the squealy bearings. Then earlier this year, with no warning, the replacement blower went on full speed, so I pulled the plug and have just been making do with the driver's side blower for some months.
Now the winter is looming though, I want to get both blowers back to working. Being as there was no issue with speed control on the old blower, I thought I’d just swap over the resistor from this one to the new blower in the van – bingo! we had variable speed back again so it was definitely the resistor at fault. Unfortunately the fix only lasted for a day, then the old resistor must have blown as well because the blower went back on full speed all the time…so I’ve had to pull the plug again. I’m wondering if there is now something up with the newer blower motor causing it to draw too much current maybe, and keep blowing resistors. So my next move is to refit the original blower after a refurb, with another resistor of course. Has anyone on here been successful at refurbing these motors? Mine deffo looks like it needs new brushes as well as the bearings sorting or just lubing. Does anyone know a good source for these brushes or even just what size they are?
Something else that’s crossed my mind, that was touched on by OAT, is blocked scuttle drains. How easy are these drains to get at to check for blockages? Eileen is parked at home near conifers, constantly shedding debris which gets right down in the scuttle area so I expect after several years of that, there’s loads of muck that needs cleaning out and I really ought to deal with it before fitting a new blower. What’s more, the driver’s side blower is getting a bit squealy too so I don’t want that one causing trouble as well, especially before I get the passenger side sorted.
#15 Re: Maintenance » Mirror dash cam » 2023-08-26 22:17:49
And washing up liquid is the poorer mans shaving foam.
Classic OAT! 'The youth of today don't know they're born!' 
#16 Re: Maintenance » Mirror dash cam » 2023-08-26 22:08:59
Shaving foam is the poor mans rainex
Nice one Casper. I'll bear that in mind for when I start shaving!
#17 Re: Maintenance » Mirror dash cam » 2023-08-26 14:22:18
Interesting that you've put the camera on the inside looking through the window
I've put a reversing camera on mine but on a separate screen just above the passenger door so I can look around and at the screen at the same time
I need to hear more about that 306
Ah the 306 lol! That belongs to one of my brothers. Its a 1.9 TD on an N plate. Between me and my 2 brothers, we have 10 cars, 5 vans and 8 motorbikes....and the odd boat! I've lost count of the number of push bikes!
Re the rear camera, I figured that it would be more secure inside the back door, more discrete and away from the risk of water leaks. I've read reviews talking about these cameras failing due to water ingress. Also it meant I didn't have to drill any holes or do even more tricky wire routing to get the wire on the outside. The rear window does need to be kept clean but I've just started using Rainex spray to see if that helps.
#18 Maintenance » Mirror dash cam » 2023-08-19 22:02:40
- Eileen2006
- Replies: 8
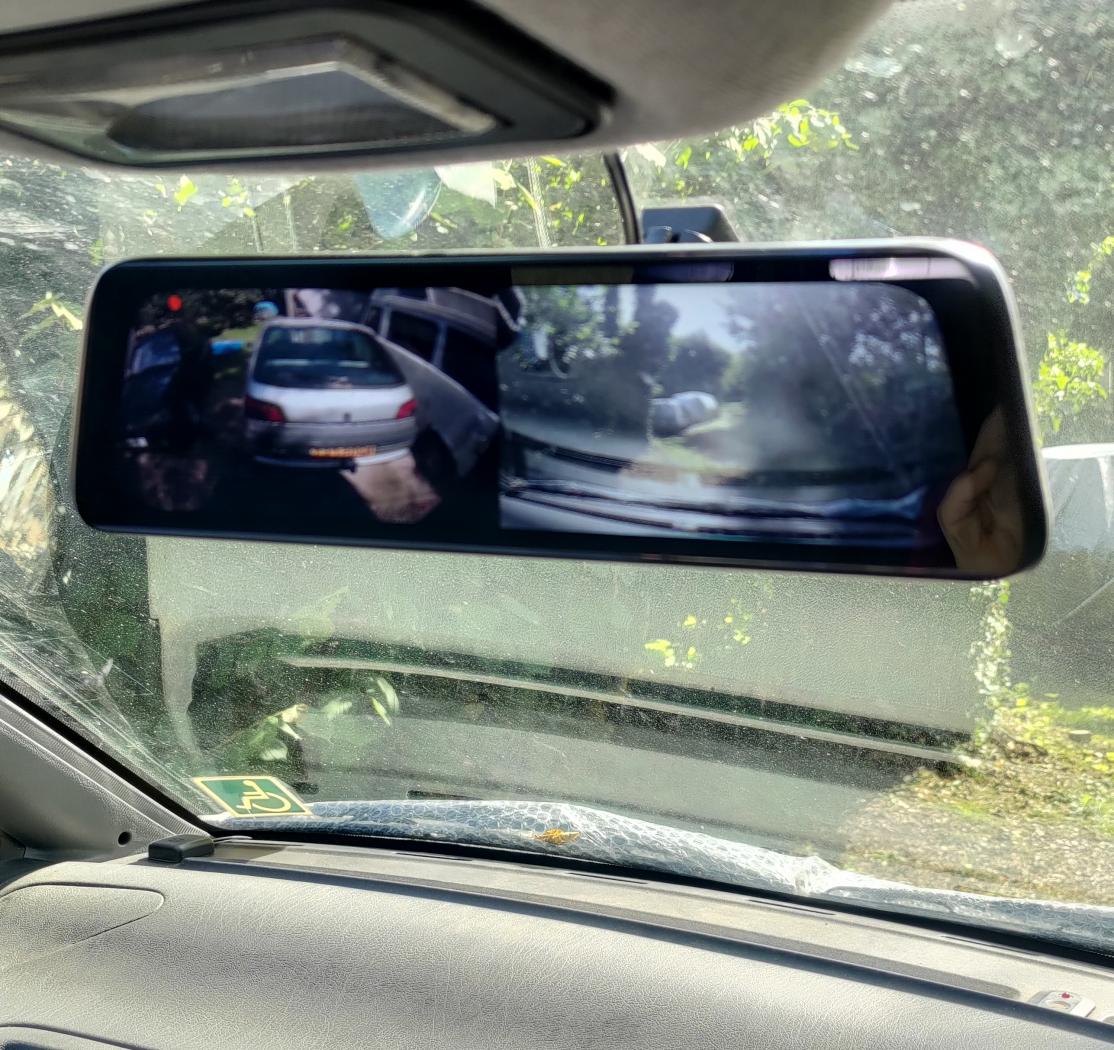
I fitted a front and rear dash cam back in February and thought I’d post my experience of installing and using it, now I’ve been able to test it out for a few months. The unit I installed is an Auto-Vox V5 Pro mirror dash cam. What with the normal rear view being so obscured by the back door pillars and wheel chair ramp, plus the interior mirror being so small as well as becoming severely delaminated and therefore virtually useless, it made sense to look at fitting a mirror type dash cam.
I had been looking around for a while for a suitable unit. A lot of the mirror dash cams are the strap on type (titter!) but I was concerned that if I installed one of these with an integral front facing camera, the mirror would be too wide to clear the vehicle’s sun visors when these were pulled down. The V5 Pro is not too wide at 10 inches and clearance with the sun visors is not an issue. Some mirror dash cams are much wider!
Also I didn’t want the cluttered wiring look, with multiple cables plugging into the mirror dash cam, that tends to be the case with units that fit over the existing mirror. The V5 Pro only has one cable emerging in the centre of the mirror’s ball joint so it gives a nice clean look. The V5 Pro also has the front mounted camera located on the right hand side of the mirror making it more suitable for use in the UK whereas lots of others have the camera located on the left hand side.
I also wanted a dash cam with a rear facing camera which functioned as a reversing camera as well, and the V5 Pro has both of these features. I now have full visibility of what is behind me and the wide field of view picks up what is off to the sides much further than you get with a conventional mirror. I have the dash cam set so that it always defaults to the rear view camera when I’m driving. When switching into reversing mode (triggered by the reversing lights coming on), the display changes to see as low down as possible rather than looking straight back. It should be pointed out that the wide field of view of the rear camera means vehicles following close behind look about twice as far away as they really are, but I found I soon got used to that and tend to use the side mirrors to check distances.
Another feature that I wanted, and that the V5 Pro has, is hard wiring into the vehicle electrics rather than plugging into a cigar lighter socket or similar. This looks neater and also means the cigar lighter socket remains free to use for phone charging etc. The hard wiring involves using fuse taps connected to both a permanent and switched live circuit in the internal fuse box. Unfortunately the kit only comes with micro fuse taps so I had to buy the standard fuse type on line.
There are a few downsides with this dash cam, the main one being that the install was rather involved and time consuming. Generally speaking though, I'm very happy with it. Putting the dash cam recording function to one side, just having a decent rear view is a major benefit.


#19 Re: Maintenance » Air Bag warning light intermittent » 2023-08-19 09:17:21
I'm fortunate to have never had any issues with my airbags - all zero of them - but my understanding is that the classic explanation is normally the wiring under the seat
Isn't there the airbag ECU under the passenger seat under the rubber mat? I think all the wiring is coated in orange insulation
Thanks kenbw2. Glad to know you've not had any issues with your zero airbags Yeah after doing a search on here, I've kinda figured out where the airbag ecu is. I have a suspicion it's under the rubber mat where there is a small bump on the floor in the gap between the front seats but will investigate later and post back what I find. I was also wondering if it could be a dicky contact in the wiring under the steering wheel airbag being as the turning of the wheel over the years might stress this to the point of failiure.
#20 Maintenance » Air Bag warning light intermittent » 2023-08-18 22:18:18
- Eileen2006
- Replies: 13
Hi Folks,
Would appreciate your input as the air bag warning light has started coming on intermittently. When first starting, it goes through the usual self test phase and goes out but then will come on at some point in the journey. Then if you park up, switch off and restart later, it tends to either do the same or stay on after the self test. I'm thinking it can't be a faulty air bag ecu or air bag as it would be on all the time. Maybe faulty wiring?
The weird thing is it only started doing it a couple of months ago immediately (within minutes) after I'd disconnected the near side ventilation blower motor which had gone full speed (broken resistor array I'm guessing there!). It's never done it before but surely this must be a total coincidence 
TIA
David
#21 Re: General Discussion » JUST A HEADS UP FOR DOOR LOCK SUPPLIERS » 2021-05-08 11:59:28
i have done this before.. i had multiple barrels and took all of the "pins" out of them that was too big when the door key was in the barrel the filed them all down to the right size.
the issue with these ignition barrels is they not only have the standard pins, but they also have pins on the side of the key! i have 3 different keys (different pin profiles.. you can physically see it!) and all of them unlock the doors, but only one fits in the ignition.
2 days ago i lost my main key at work.. im pretty upset about that as i miss the flip out key even if the central locking remote did not work.. which reminds me.. i need to do some immobiliser bypassing.. if i loose this last key im screwed. have to hide a switch somewhere haha.
Interesting point that you have 3 different keys and all of them unlock the doors etc. How weird!! Like the ignition barrel, the rear door lock I dismantled also has pins on the side of the key. There are 5 pins that engage with the top/bottom of the key and 4 pins on the side.
Unfortunately I'm going to have to park this little project for a while as Eileen has sprung a coolant leak again and the exhaust needs attention sooner rather than later 
#22 Re: Maintenance » Coolant leak on DW8B » 2021-05-06 10:56:18
try some loctite 5660 plastered round it and then shoved in to place, needs left overnight tho.
- I recently mixed that with some granville red high temp sealant as a bodge for a diesel tank outlet, it's working fine surprusingly, no leaks lol.
Edit: I use the 5660 for boost hose leaks on old VW's as most of them have silly wee wings that keep the pipe i plac e with a clip that slips/springs over the pipe, crap design... I find plaster with some 5660... it's hard to even pull the pipe off with no clip after it has cured lol.
Thanks Stu-D. Deffo worth a try....... Will keep you posted.
David
#23 Re: General Discussion » JUST A HEADS UP FOR DOOR LOCK SUPPLIERS » 2021-05-05 22:57:26
one thing that annoys me somewhat with after market/replacement door lock sets for the mk1/2 is that they never include the ignition barrel and key... pretty annoying. is it too much to ask for one key to fit all locks? i can live with the filler cap being a different key... sigh..
I agree entirely. I may well have a go at dismantling an ignition barrel at some point too.......I know, too much time on my hands
#24 Maintenance » Coolant leak on DW8B » 2021-05-05 22:52:44
- Eileen2006
- Replies: 2
This one is driving me nuts and I can't believe I'm the only one that's ever had this trouble, but I can't find any posts mentioning it on here....probably me not using the right search terms.
Anyway, I had to replace the bottom hose on the Expert and sourced a good quality Gates item. Ever since fitting this though, I've been plagued by leaks from the joint where the hose fits into the bottom of the rad. I've no idea why this joint couldn't use a good ol' fashioned type connection with a hose clip like elsewhere but obviously it doesn't. Recently the leak has got far worse to the point where I have to top up the expansion tank every time I use the vehicle. A couple of months ago I tried sealing the joint with blue hylomar....big mistake! That made the leak far worse! The last time I attempted a fix, I removed both the rad and the bottom hose to examine the mating faces at close quarters and clean off the hylomar residue - no issues found. I presume the leak is due to the rubber O ring type seal, not an O ring I know but similarish, not sealing properly. On reassembly, I applied some sanitary silicone sealant to the joint and it was perfect for a fortnight but has now started leaking again.
Where next? Any ideas would be greatly appreciated. The gal needs plenty of other jobs doing but this nightmare keeps demanding attention.
#25 Re: General Discussion » JUST A HEADS UP FOR DOOR LOCK SUPPLIERS » 2021-05-05 21:50:19
Don't know if anyone on here has already attempted this (probably  ) but I'm having a go at rebuilding the rear door lock on our Expert. This must have been changed at some point as the key doesn't fit so I want to change the combination. I've got a spare lock apart, just need to get some extra lock pins from somewhere and job done.
Will post pics on here when finished......